
PAPER AND CARDBOARD CONSTRUCTION
GEORGE FRED BUXTON
DIRECTOR OF THE MANUAL TRAINING DEPARTMENT STOUT INSTITUTE.
MENOMONIE, WISCONSIN
AND
FRED L. CURRAN
SUPERVISOR OF ELEMENTARY MANUAL TRAINING AT STOUT INSTITUTE
BOOK PROBLEMS
BOX PROBLEMS
CARD PROBLEMS
ENVELOPE PROBLEMS
AN ANALYSIS OF THE SCOPE OF PAPER AND CARDBOARD
CONSTRUCTION FOR PRIMARY GRADES OF PUBLIC
SCHOOLS. – AN OUTLINE OF A COURSE WITH DIRECTIONS
FOR MAKING THE PROBLEMS -INFORMATION
REGARDING COURSES, EQUIPMENT, SUPPLIES,
AND METHODS OF HANDLING THE WORK,
A BIBLIOGRAPHY OF THE SUBJECT
THE MENOMONIE PRESS
MENOMONIE, WISCONSIN
Publisher’s note:
First published in 1911, this book is based on the teachings at the Stout Institute. With over 100 illustrations and detailed descriptive text the book is designed for teaching children, but those newly attracted to bookbinding will find the information within quite valuable. Some of the obsolete informations like cost of supplies and defunct paper sizes were ommitted.
FOREWORD
REALIZING that teachers of primary handiwork need definite directions for handling paper and cardboard construction in public school classes, with such supplementary information regarding the selecting, ordering, and care of equipment and supplies as shall be of immediate help in starting the work, the authors have prepared the following outlines and notes in the form of a hand book especially for their use.
It is also planned to be of service to supervisors of primary handwork as a suggestion for the organization of a course of study and as a collection of supplementary problems suitable: for the lower grades. The notes at the back of the book may be of considerable value in saving time looking up minor details. Art supervisors who handle paper and cardboard construction may find the book problems suggestive as a basis for decorative and illustrative treatment.
Problems have been selected which are suited to the grades indicated and have been carefully tested out by grade teachers in the Menomonie public schools for several years. The point of view thruout the course has been that of an emphasis upon the simple processes involved in typical uses of paper and cardboard in the industries, making such modifications as are required to meet the abilities of young children, and to eliminate all apparatus used in duplicate work. The attempt is made to involve a rational sequence of difficulty in each kind of work undertaken and to encourage careful work from the start. Although the production of good pieces of work is made prominent in the course, many teatchers may choose to use certain of the problems for illustrative purposes in connection with other subjects. In any case the primary handwork should be so handled that the entire school program will become unified for the benefit of the pupil and not stereotyped for the benefit of a logical course.
ANALYSIS OF CONTENTS
I. Introduction Purpose of book is to arrange typical paper constructions in sequence for class use,there is an evident need for this handy form,simple paper cutting should accompany the construction here outlined,illustrative constructions not appropriate to paper are omitted,unusual shapes are not recommended,four kinds of work in paper are given for each of the first four grades and classified by numbers,extra work is suggested for schools having time for it,a standard size of stock is to be used,it is shown that the teacher must make careful preparation before presenting anew problem.
II. Book problems
Sequences are suggested but detailed directions may be omitted,books may be made as an aid to other studies, art teachers find many uses for small books,problems here are limited to 9″x12″ stock,an arrangement by grades is suggested,a definite arrangement of information is made for each problem.
The following groups are given to show the scope covered:
Folders: two, three, and four fold; booklet folder
Portfolios: single paper, paper with lap, cloth covered, with cloth corners, note book covers Paper files:pocket and desk files
Pamphlets: for notes, drawings, and mountings; glued, tied, sewed, and with reinforced back
Bound books:cloth covered, with cloth corners, bound magazines, rebinding
III. Box problems
Box making as an industry is important, many uses of boxes in schools suggest themselves, devices for repeating processes are omitted here, box problems are arranged by grades. The following groups are given to show the scope covered: Open boxes: tag board, bristol board; covers lapped, reinforced corners, trays
Folding boxes: tag board, bristol board; with laps, with fitted fastenings Covered boxes: straw board, box board; reinforced corners, lining, covering Sliding box: box board, fitting of box and case
IV. Card problems
Card mounts furnish a good opportunity for a study of color and design, various illustrative materials may be mounted for use, card problems give good drill in measuring and cutting to line, a sequence of difficulty is shown for all card problems. The following groups are given to show the scope covered: Card mounts: for drawings, and photos; folder picture mounts Book marks: simple outline, punched and cut with tab Tag board work: glass cover, postcards, shipping tag
V. Envelope problems
Envelopes are thoroly suited to paper work, a variety of envelope problems may be introduced with profit into the lower grades,, many uses are obvious, an arrangement is shown for each grade. The following groups are given to show the scope covered: Mailing envelopes: Square, medium, long Filing envelopes: paper envelope holder, pocket for clippings, tag toard filing envelopes Envelope files: flat envelope file, book envelope file Paper sacks: flat and with folds
VI. Planning of courses The book is planned to be suggestive for a variety of systems and requirementsfundamentals in planning include the adjustment of problems to fulfill stated aims and the suggestion of method,the numbering system is explained.
Courses in primary handwork may be planned with an emphasis upon sequence of processes, upon grouping of types of construction, or upon the thought side of the subject,the work may be considered from the standpoint of the technical and art value of the subject itself or from that of the whole elementary school course,the analysis of the course may center around the handling of the work in classes or it may concern itself first with a study of children’s interests.
Different arrangements by grades are suggested and others may seem desirable in certain localities,the first arrangement provides for all of the book problems in a given grade to be followed by all of the box problems, then the card problems and envelope problems,the second provides for a succession of one of each kind of problem, followed by a succession of another of each kind, and then another, for the sake of the interest which comes from variety,the third provides for a selection from each of the groups arranged in order of difficulty for the entire scheme, the fourth provides for a study of one group more carefully in either the third or fourth grade.
VII. Equipment and supplies
Simple equipment is needed in the class room but it should be properly cared for,a good stock room equipment for the supervisor makes for efficiency,several kinds of paper and cardboard are desirable,a table for ordering paper, gives materials, kinds, sizes, costs, and quantities, other supplies are easily obtained,kinds of supply houses are indicated for reference,a second table arranged by grades gives the kind and amount of stock required for each problem.
VIII. Hints to teachers and
Careful preparation requires that a teacher shall analyze a problem thoroly before teaching it,the proper care of equipment and supplies requires that things shall be instantly available, properly counted, and in usable condition,good teaching requires that materials shall be distributed quickly and without confusion, that directions and other information shall be given in a clear, pointed, and interesting way, good management requires that pupils shall be kept constantly busy at: understood problems, that work shall be collected and cared for systematically, and that all details shall be made to fit into a complete scheme in the mind of the teacher. A supervisor must find suitable occassion for getting necessary directions before teachers,he must see that supplies are ordered, prepared, and delivered to schools on time,he must visit classes and in other ways test the character of the work of teachers,he must find some way to train such teachers as are not handling the subject successfully,he may arrange for exhibitions of school work,he will constantly study the various aspects of his specialty and make it of more value to his community.
IX Bibliography list of books and magazine references is given for the benefit of students and of public school officers and teachers.
Appendix
Specimens of twenty-four papers suitable for primary construction are mounted and described. They include: cover papers, print and book papers, bond and flat writing papers, marble and glazed papers, wrapping, blotting and gummed papers.
INTRODUCTION
BOOKS on paper and cardboard work for public schools have appeared from time to time and are in many cases serving a good purpose. There still remains, however, one field which does not seem to be adequately handled and to which this book attempts to make contribution. That is: a course in cutting, measuring, folding, pasting, gluing, sewing, punching, tying, and decorating a variety or paper materials, with a definitely organized series of problems in the making of books, boxes, card mounts, and envelopes. The problems selected are only of these four kinds, because these seem to be the most thoroughly suited to the materials from the worker’s standpoint and! because they furnish so rich an opportunity for varied manipulations, and such an attractive basis for applied design in the lower grades.
It is believed that in presenting this arrangement of material in handy form, many teachers and supervisors will find some of the help they have been looking for, and it has already become evident that those who have attended Stout Institute desire such a grouping as is here given. In fact, the principal reason for the preparation of this printed course is the constant demand for the less adequate blue prints which have been, issued at Stout Institute.
Problems in simple paper cutting have been omitted from the outlines for the reason that no construction is involved and no measurements required. It is not to be inferred, however, that this work is not recommended, but it is not made a subject by itself.
Paper cutting from pose and from memory, and the cutting of designs are recommended as supplementary work and provision may be made for mounting them upon the card mounts or in some of the book problems. They are especially to be recommended at the beginning of the first grade.
Paper furniture and houses and other problems used in an illustrative manner in connection with other subjects are not considered a part of the present subject and not a part of the primary handwork which leads to forms of manual training in the upper grades. It is believed that most schools will find the problems which are more typical of the material, to be of more value as pieces of construction.
Unusual shapes, saw toothed edges, highly colored floral decorations, inappropriate types of construction, over complex forms and other eccentricities should be avoided everywhere, but especially with young children. These have been carefully excluded from this outline.
While the problems are listed on the following pages as book problems, box problems, card problems, and envelope problems, it is not to be understood that they should be taken in this order and all of the book problems finished before taking up the box problems. Each class olf problems is planned for all four grades and distinguished by three numbers representing:The grade; the class of work; and the relative place in the grade for that class of work. (321 covered small box,is thus in the 3rd grade; it belongs to the box problem group,”2″; and it is the 1 st box problem in the third grade.) This is more fully explained in [16]chapter VI under “Planning of Courses”.
Rather more problems have been suggested: than most schools can complete within the time usually allotted to the subject. This provides for considerable choice on the part of the teachers. Many options are also recommended in the foot notes.
As explained in [17]chapter VII under “Equipment and Supplies,” the exercises are planned to use 9″x 12″ stock. This is frequently to be cut into two pieces 6″x9″, and occasionally cut to other sizes. In case there is no provision for cutting a quantity of stock, the pupil may be given 9″x12″ stock for everything and be required to save the unused pieces for later work. This use of uniform sizes will be found of considerable convenience in the class room.
Before presenting the work to the classes, the teacher should first, make the problem; second, consider carefully the various steps in the processes of construction; and third, be very definite and clear with directions. The pupil’s best effort should be required at all times and his standard of good work constantly raised. A number of hints for the teacher are given in [18]chapter VIII, but most important of all is the necessity that the teacher shall know the subject thoroughly. The directions given for each problem are no substitute for careful preparation, if success is to be assured. Six kinds of lines are given on page 15 to illustrate their use in connection with the directions for each problem suggested.
111. Mounting Folders
3 pieces Rough gray cover paper, 6″x9″
3 pieces White book paper, 6″x9″
Paste
Scissors
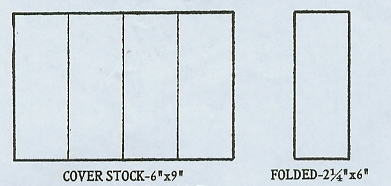
DIRECTIONS FOR TWO-FOLDS
a. Fold upper left corner to upper right corner and crease
b. Cut from white paper several representations of common objects, of flowers, leaves, trees, tools, workmen at typical occupations, or children at play These may be cut from memory or direct observation
c. Select the best group of cuttings and paste in folder
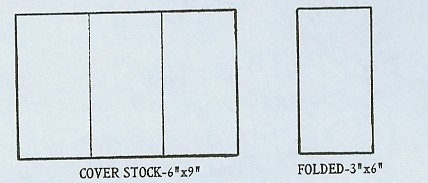
DIRECTIONS FOR THREE-FOLDS
a. Fold upper right corner two-thirds distance across top, judging distance with the eye
b. Fold upper left corner to crease
c. Cut and paste representations as in first folder
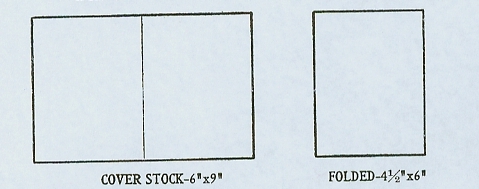
COVER STOCK DIRECTIONS FOR FOUR-FOLD
a. Fold upper right corner to upper left corner
b. Fold these two corners to center crease
c. Cut and paste as before NOTE In of these folders, it may seem desirable to paste magazine illustrations or other clippings in place of the cuttings indicated, or other uses may suggest themselves to the teacher. Careful folding and clean pasting should be expected.
112. Booklet Folder
1 piece of Rough gray cover paper, 6″x9n
1 piece White book paper, 6″x9″
Paste or glue
Soft or medium pencil

BOOK OPEN-SHOWING TORN EDGES DIRECTIONS
a. Tear from 1/4″ to 1/2″ from two adjacent edges of the white paper, without measuring
b. Fold upper left corner of white paper to upper right corner
c. Fold upper left corner of cover paper to upper right corner
d. Run a little paste or glue along back of crease of white paper and press it inside of cover paper
e. Allow to dry and use for sketching plants or animals or children, or for copying photographs
113. Pocket Note Books
3 pieces Rough cover paper, 6″x9″ 6 pieces
Print paper, 9″xl2″
1 yard Coarse linen thread Large needle, letter opener or kitchen knife
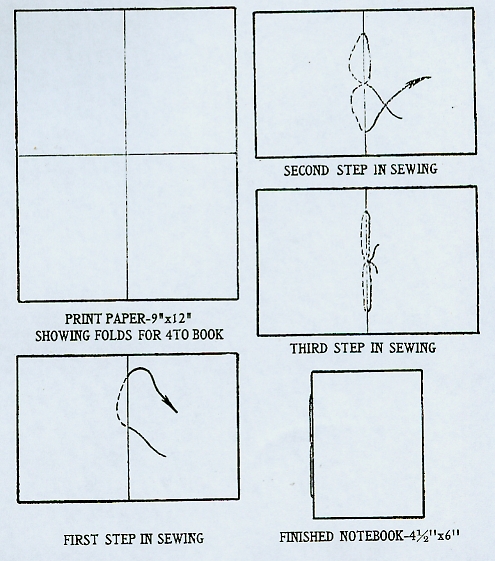
SECOND STEP IN SEWING DIRECTIONS FOR QUARTO BOOK
a. Fold one piece print paper lower left comer to upper left comer
b. Fold upper left corner to upper right corner
c. Fold second piece of print paper in the same way and insert into first piece
d. Fold cover paper left to right and insert folded print paper
e. Sew down thru center of book, up near one end, down thru center again, up near opposite end, and tie square knot near the center
f. Tear leaves apart with letter opener, kitchen knife, or back of scissors
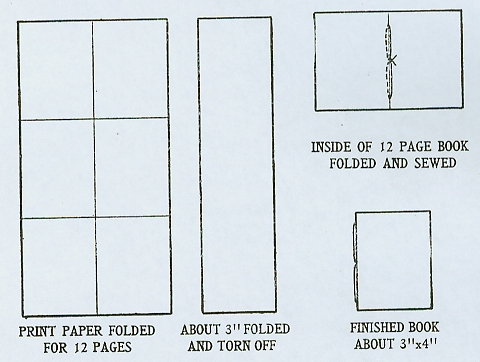
INSIDE OF 12 PAGE BOOK FOLDED AND SEWED DIRECTIONS FOR 12 PAGE BOOK
a. Fold one piece print paper lower left corner about two-thirds distance to upper left corner
b. Fold upper left corner to this crease and open paper flat
c. Fold upper right corner about two-thirds distance to upper left corner, make sharp crease, open, and tear off smaller piece
d. Refold larger piece and then fold left to right
e. Make a second piece like this and insert
f. Cut cover paper a little larger than open book, fold left to right, and sew print paper-inside same as in 4to book
g. Tear leaves apart as before
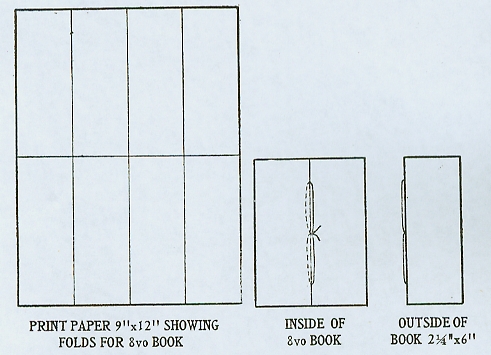
PRINT PAPER 9 DIRECTIONS FOR OCTAVO BOOK-16 PAGES
a. Fold print paper right to left
b. Fold bottom to top
c. Fold left to right
d. Place one or two of these pieces in cover previously cut a little larger than open book
e. Sew and tie as before
f. Tear leaves apart
NOTE
These note books may be used for writing practice, or for sketching, or for such purposes as seem desirable to the teacher in connection with any other subject.
114. Book of Color Schemes
1 piece Colored rough cover paper 6″x9″ 2 pieces
Gray cover paper 6″x9″ 14″
Coarse linen thread or binders’ thread Large needle
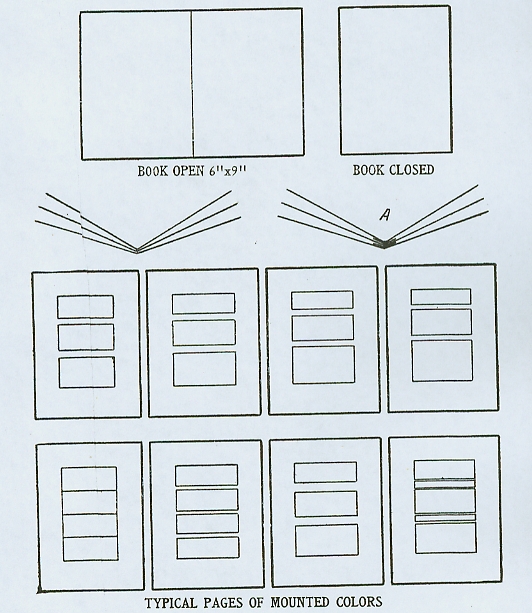
TYPICAL PAGES OF MOUNTED COLORS DIRECTIONS
a. Fold gray paper inside of colored paper
b. Sew and tie as in number 113. If more space is wanted between pages, extra pieces of gray cover paper 1″x6″ may be folded and sewed into the book, as shown at A
c. Mount rectangles of colored papers upon each inside page, so as to show good color schemes, keeping in mind both quality and quantity of each color
NOTE
Samples of fabrics or of different kinds of papers may be mounted in place of color schemes.
The following arrangement is suggested for mounting paper samples:
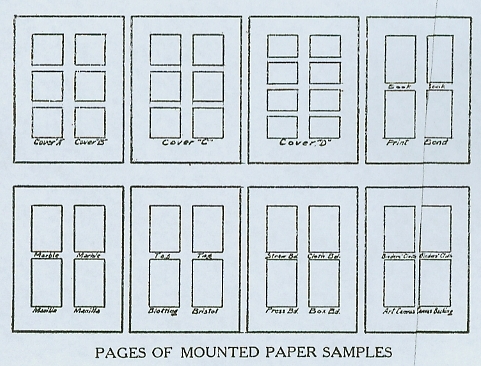
PAGES OF MOUNTED PAPER SAMPLES
115. Drawing Book
1 piece Gray cover paper 4 1/2″xl2″
2 pieces White book paper 9″xl2″ 15″
Coarse linen thread Large needle, pencil
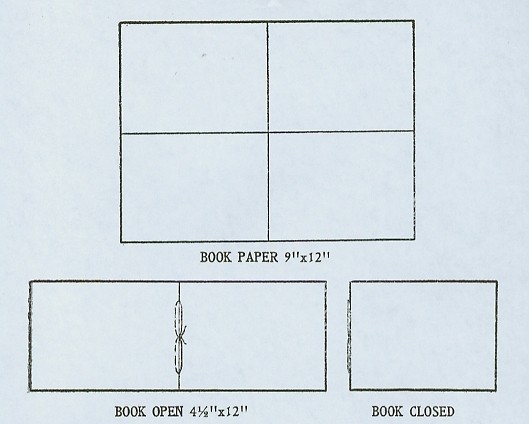
BOOK OPEN DIRECTIONS
a. Fold book paper bottom to top, having length of paper horizontal
b. Fold left to right
c. Fold cover paper left to right
d. Place book paper inside of cover paper
e. Sew and tie as in number 113
NOTE
Use for drawings; flowers, grasses, fruits, vegetables, or small objects.
116. Laundry List
2 pieces Manilla paper 9″x12″ 8″ Silk cord
1 Eyelet
Eyelet punch, letter opener, pencil
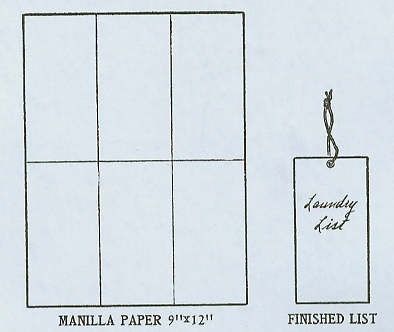
MANILLA PAPER 9 DIRECTIONS
a. Fold 2 pieces manilla paper right edge two-thirds distance to left edge
b. Fold left edge to crease
c. Fold top to bottom d
. Fasten eyelet near center of top
e. Tie loop of cord thru eyelet for hanging
f. Tear leaves apart with letter opener
g. Write “Laundry List” upon outside
NOTE
Use to record articles sent to the laundry so as to check up proper return. Other uses than as Laundry List may be suggested and the name changed accordingly.
211. Paper Portfolio
1 piece Cover paper or press board 6″x9″
1 piece Stay tape 9″ long
Scissors, pencil, rule
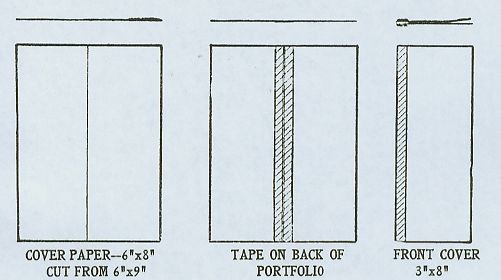
DIRECTIONS
a. Lay out cover paper 6″x8″, and cut to size Measure from lower corner and mark each edge of paper, connect marks, cut to line. b. Fold left to right c. Stick stay tape over fold and cut ends even with top and bottom of portfolio
NOTE This may be used for carrying folded letter paper, or clippings, or school work. It is a convenient size for the pocket. By making the folder from 9″ square stock, it will be 4 1/2″x9″, suitable for carrying a large variety of folded papers. It may seem desirable to make both sizes.
212. Paper Portfolio with Laps
1 piece Heavy cover paper
1 piece Stay tape 19″ long
Rule, pencil, scissors
DIRECTIONS
a. Lay out three 4 inch measurements across top and bottom of 9″x12″ cover paper, and connect these with straight lines b. Set off 1 inch measurements from each corner, and connect across corners as shown in drawing c. Cut off corners d. Fold right edge nearly to first line e. Fold left edge nearly to this crease f. Unfold and stick pieces of stay tape over creases along the back of portfolio
NOTE This is to be used for the same purpose as number 211 but has the advantage that it holds papers more securely.
213. Book of Designs
3 pieces Gray cover paper 6″x9′
1 piece While book paper 9″x12″ 18″
Coarse linen thread
Paste Scissors, rule,, pencil, needle
DIRECTIONS
a. Lay out each piece of cover paper 8 inches up from bottom edge and cut to 6nx8n b. Fold left to right and place two pieces inside of third, which will serve as cover c. Sew down a little distance below center,, up a little distance above center, down near top, up thru second hole:, down thru first hole, up near bottom d. Tie square knot at first hole
NOTE Cut units of design suitable for borders or “all over” repeat patterns from white paper and paste in the book when complete. Front cover of book rnay have a small unit of design mounted just above the center, or pupil may print DESIGN on the cover, or a printed label may be fastened on with paste.
214. Weather Record
2 pieces India tint book paper 6″x9″
1 piece Black plain cover paper 3″x6″
1 piece Dark blue cover paper 3″x6″
1 piece White book paper 3″x6″
Paste Scissors, needle
DIRECTIONS
a. Fold bottom to top b. Fold left to right c. Sew as in number 113 d. Cut standard weather flags from blue and black plain cover paper, and from white book paper e. Paste one of each kind of flag upon front cover cover
NOTE Save the extra flags for inside of book to indicate the weather for any given week or more. The proper flag for a day rnay be pasted in its proper square in the afternoon. Government flags iare displayed from 10:00 a. m. until sunset, to indicate the weather for the following day. The weather signals are as follows: White flagclear and fair weather Blue flagrain or snow Black triangular flagtemperature signal, indicating rising temperature when placed above another flag, and falling temperature when placed below White and blue striped flaglocal showers White flag with black square centercold wave
215. Receipt Book
1 piece Cover paper 6″x9″
2 pieces Bond paper 9″x12″
1 piece Binders’ cloth 1″x9″ 15″
Silk floss
Scissors, needle, pencil
DIRECTIONS
a. Fold bond paper right to left, bottom to top, left to right b. Lay out and cut cover 5″x6 1/2″ c. fold cover left to right d. Sew bond paper into cover, one section inside of the other e. Cut strip of binders’ cloth 1 “x6” and glue on of book to cover sewing f. Letter the front cover
COOKING RECEIPTS
NOTE Stay tape may be used in place of the binders’ cloth but it is a bit more clumsy, A more useful book may be made if three or four sheets of are used, making 48 or 64 pages
216. Note Book
1 piece Cover paper 6″x9″
2 pieces Manilla paper 9″x12″ 24″
Linen thread
Glue
Scissors, needle, pencil
DIRECTIONS
a. Fold manilla paper right to left, bottom to top, left to right b. Lay out and cut cover 5″x6 1/2″, and fold as shown c. Sew the two sections of the book together starting above the center of one section, and following steps shown in cut, fastening ends with square knot d. Spread glue along inside crease of cover, one-half inch wide e. Press book into cover f. Write or print upon front cover
NOTE This is the first problem involving the sewing of sections together in book binding. The process has been simplified to the easiest steps possible. Problems following this have also been modified to suit conditions of the usual class room without extensive equipment.
217. Paged Blank Books
OCTAVO SIZE
1 piece White book paper 9″x12″
1 piece Heavy cover paper 6″x9″ 15″
Thread
Needle, scissors, pencil sheet
DIRECTIONS
a. Letter sheet,A, B, C, D, as indicated in drawing b. Place sheet in position so that A B will be at top of paper and C D at the bottom c. Fold right to left d. Fold bottom to top e. Fold left to right f. Open sheet and place in original position,A B at the top g. Place numbers tor pages on front of sheet as indicated in the drawing h. Turn sheet over so that D is under upper left hand corner and write numbers as indicated in second drawing i. Fold sheet again in the same way that it: was first folded j. Cut cover 5″x6 1/2″ and fold k. Insert folded sheet in cover, sew, and tie l. Tear leaves with paper knife or back of scissors
NOTE Sheet must be folded the same in “i” as it was in “c,” “d,” “e,” or the paging will not be correct
DUODECIMO SIZE BLANK BOOK
1 piece Heavy cover paper 6″x9″
1 piece White book paper 9″x12″ 15″
Thread
Needle, scissors, pencil
DIRECTIONS
a. Place paper on desk with A B at bottom b. Fold bottom edge up two-thirds distance to top c. Fold top edge down to fold d. Fold right edge to left edge e. Fold bottom to top f. Unfold sheet and place in such a position that A is in the upper left hand corner, and B in the lower left hand corner g. Number pages as indicated in drawing h. Reverse sheet so that B will be under the upper left hand corner and A under the lower left hand corner i. Number pages on back of sheet as indicated in drawing j. Refold sheet in same manner as it was first folded k. Cut cover 4 1/2″x5″ and fold l. Insert folded sheet in cover and sew as before
NOTE These problems furnish opportunity for the teacher to explain to the pupils how a book is printed, folded, sewed, trimmed, and bound. Booklets with 16, 18, 32, 36, or 48 pages may be worked out as supplementary problems. The printer usually prefers to fold into 8, 16, or 32 pages in order that the folding may be done iiom edge to edge. Some of the other foldings and pagings are given below. The stock for each book is 9″x12″ and a cover is planned to allow 1/4″ projection. A section of 16 pages may be made by folding R to L, T to B, M to C. The illustration shows the paging on both sides of the sheet, At the left is shown a single page and the open book in its cover.
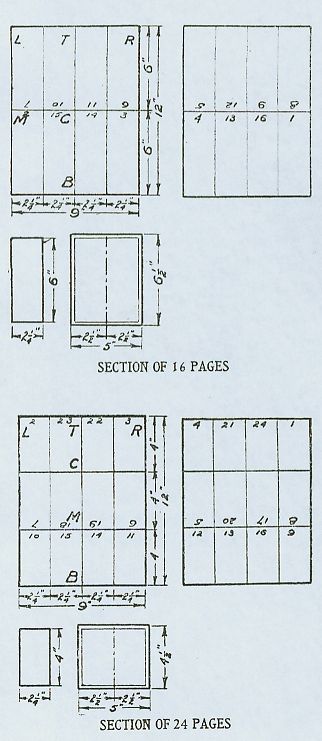
A section of 24 pages may be made by folding R to L, M to T, B to C, L to T. This is a difficult fold and not often employed. A printer would more commonly use two sheets, one of 16 pages and one of 8 pages. A section of 32 pages may be made by folding B to T, R to L, M to K, J to K. This is as many pages as usually fold well together in a single section, although thin book paper may sometimes be folded into 64 pages or more in pamphlet work.
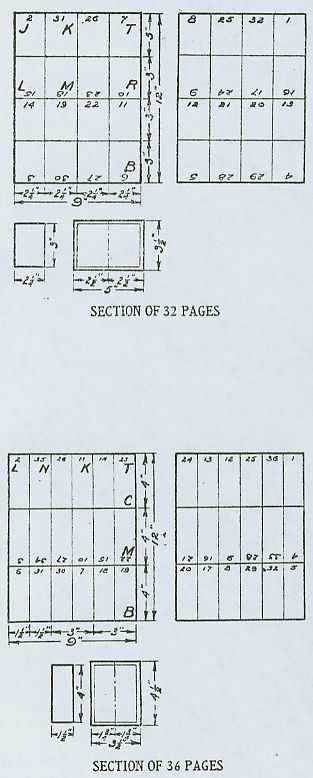
A section of 36 pages may be made by folding M to T, B to C, K to L, T to N, L to N. In place of this sized section it is more practical to fold two sections of 16 pages and one of 4 pages. The practice here in careful folding, however, is worth the attempt at 36 pages in school.
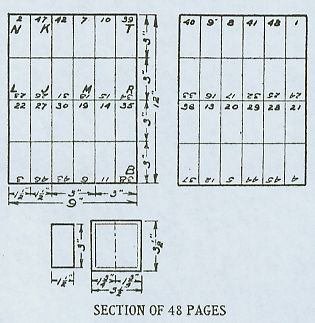
A section of 48 pages may be made by folding B to T, M to L, R to J, Jf to K, N to K.
PROBLEMS in the making of folders, small pamphlets, portfolios and bound books are described on the following pages and arranged in a sequence representing work of increasing difficulty for each of the first four grades of public schools. The first figure of each problem number indicates the grade in school as suggested on page 10 of the introduction. The sequence is more noticeable in some places than in others, but in general it will be found that the work meets well the abilities of the children. It is within the range of successful handling and yet: requires a real concentration of effort thru-out the course. While sequences and definite steps are given emphasis, it will be: found possible to vary considerably from the outline, and many supervisors will want to do this. It may seem best in teaching, not to give such detailed information to the children, but to assign a problem and allow the children to find out for themselves how to make it. Even here, however, the teacher must have in mind a definite line of processes in order to properly describe each problem and to be of help to each child, and the steps suggested will be found at least typical.
While the idea back of the choice of book problems has been the manipulation of material for the training of hand and eye and for an acquaintance with basic processes in the making of books by hand, there is no limit to the use which may be made of the articles made in correlation with other school subjects. Many uses of booklets for gathering notes and illustrative material will occur to the teacher. Where the making of books is incidental to the using of them, the outlines will only be used as hints. It is believed that the book problems will furnish to many teachers the directions they have been wanting in handy form for the natural correlations between construction and other school subjects.
An especially valuable feature of the book problem is the opportunity it furnishes for the mounting of illustrations cut from old magazines, and of free cuttings; and much may be made of the use of books for drawings and designs, either made directly in the; book or cut and mounted. Cover designs offer another attractive field for crayon and water color as well as for pencil and pen and ink work. In some cases it is possible to have the children make fairly attractive lettering upon the covers. In all cases the choice of proportions in the making of booklets is important and may be an attractive field for the art teacher. In the books suggested, the limitations due to size of stock should be obvious, as a standard size of 9″x 12″ for all problems has been selected. Books of larger size can be made only if extra paper not cut from the full stock sheet be supplied. If larger sheets than the 9″x12″ be used, the binder’s typical methods of folding may be employed and one sheet folded so as to make eight or sixteen pages of fair size. It will be noted also that if funds permit, some of the higher grades of paper may be used and better products obtained. If a printing press be available, very pleasing announcement folders and booklets for special occasions may be made and the use of type in page design be illustrated. Printing is especially desirable in upper grades and in high school classes but it does not come within the scope of this book.
The arrangement of book problems by grades is given on the following page to enable the teacher to determine at a glance the place of a particular piece of work in the series of book problems.
First Grade
111 Mounting folders (Rough cover paper)
112 Booklet folder (Rough cover paper, book paper)
113 Pocket note books (Rough cover paper, print paper)
114 Book of color schemes (Colored and gray rough cover paper)
115 Drawing book (Cover paper, book paper)
116 Laundry list (Manilla paper)
Second Grade
211 Paper portfolio (Cover paper or press board,- stay tape)
212 Paper portfolio with laps (Heavy cover paper, stay tape)
213 Book of designs (Cover paper and book paper)
214 Weather record (Book paper)
215 Receipt book (Cover paper, bond paper, binders’ cloth)
216 Note book (Cover paper, manilla paper) 217 Paged blank bock (Cover paper, book paper)
Third Grade
311 Scrap book (Colored and gray cover paper)
312 Sewed pamphlet (Cover paper, book paper)
313 Pamphlet with reinforced back (Cover paper. – book paper, binders’ cloth)
314 Cloth covered portfolio (Straw board, binders’ cloth, marble paper)
315 Glued booklet (Cover paper, book paper)
316 Cloth bound book (Cloth board, binders’ cloth, cover paper) Fourth Grade
411 Pocket paper file (Manilla tag board)
412 Desk paper file (Heavy tag board)
413 Note book covers (Straw board, binders’ cloth, cover paper marble paper)
414 Portfolio with cloth corners (Cloth board, binders’ cloth, cover paper, marble paper)
415 Bound scrap book (Strawboard, binders’ cloth, colored and gray cover papers. 416 Bound drawings (Heavy cover paper)
417 Rebound book or bound magazines (Material depends upon problem) It is to be understood from this list that other problems such as boxes, envelopes, and card mounts, are given in each grade following the book problems. For the outlines as given in the following pages the arrangement of information is indicated below:
(I) Number and name of problem This is fully explained in chapter VI
(II) Material and equipment needed by each pupil In some cases the equipment is passed from pupil to pupil, thus requiring fewer tools
(III) Working drawing See drafting conventions illustrated below (IV) Directions for making the problem Arranged for presentation to classes (V) Notes Supplementary suggestions and explanations
The above drawing is given to explain the meaning of the different lines used on the following pages. Lines representing visible outlines of the finished problem or of the successive steps involved are drawn heavy and continuous. Fold lines are made light and continuous. Edges hidden by other material are represented by long, light dashes. Construction lines are used as a help in laying out a piece of work, but they form no necessary part of the finished work; they are composed of short dashes with longer spaces. Extensions and dimensions are used in indicating sizes. Where used, these read from the bottom and right side.
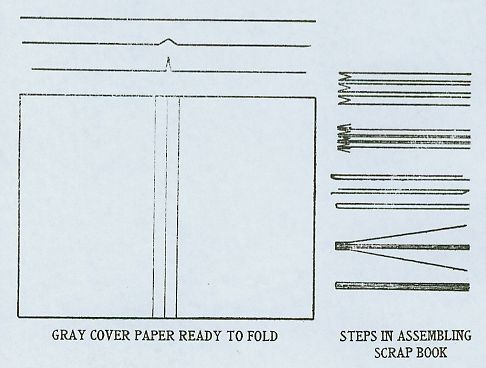
311. Scrap Book
Three sections of 16 pages each, or one of 32 pages and one of 16 pages are more generally used by printers.
1 piece Colored cover paper 9″x12″
3 pieces Gray cover paper 9″x12″
Glue
Rule, pencil, scissors
DIRECTIONS
a. Lay out three pieces gray cover paper like sketch, center lines to be 1/2″ apart and finished pages 5 1/2″x9″ These are for the leaves of the scrap book b. Fold left edge towards right, creasing along the left of the three center lines,, and unfold c. Fold right edge towards left, creasing at right line, and unfold d, Turn paper over and fold left edge to right edge e. Lay cut and cut colored cover paper 9!llxl 1/i” This is for the cover of the scrap book f. Fold left edge of cover nearly to the right edge (allow about K”) and unfold See third drawing from the top at right g. Fold right edge nearly to the left and unfold h. Glue leaves into cover, spreading glue for nearly a half inch along the inner edge of cover and press See two lower drawings at the right
NOTE This book may be used for mounting magazine clippings or pictures illustrative of school work. The covers may be made to open more freely if an extra piece of cover paper 1″x9″ be inserted at front and back as shown in second drawing bom the top at the right.
312. Small Sewed Pamphlet
3 pieces of Book paper 9″x12″
1 piece Cover paper 6″x9″ 30″
Binders’ thread
Glue
Rule, scissors, pencil, needle
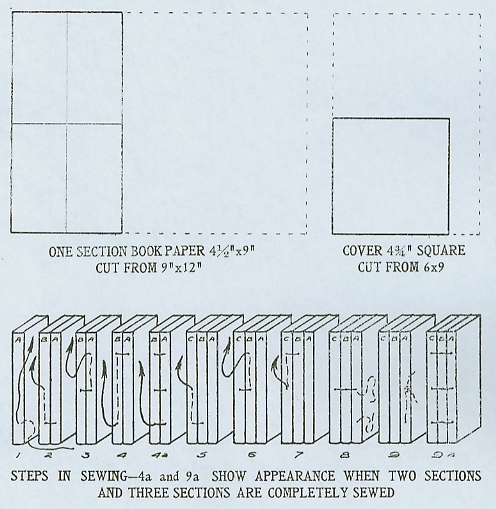
DIRECTIONS
a. Lay out and cut three pieces book paper 4 1/2″x9″ from 9″x12″, saving the larger pieces for another pamphlet b. Fold bottom to top and left to right c. Sew as shown in steps 1-8, beginning inside of section A, sewing across the back of sections A and B near the bottom, into section B, out thru the middle of the back of section B, and continue as illustrated, finishing by carrying the thread into the middle of section A, shown at “8,” and tying to the starting thread with a square knot d. Cut cover 4 3/4″ square, fold as in number 311, glue edge of sections into cover, and press e. Put simple line design on front cover
NOTE Step marked 4a shows the appearance after step 4 has been completed. Step 9a shows the appearance after step 9 has been completed. Other sections may be added to these if desired in the same manner as C is added to B in step 5.
A larger pamphlet may be made in the same manner as above, but bringing in an extra stitch to each section, and using the pieces cut oft from the stock for the small pamphlet. The tallowing materials are required.
6 pieces Book paper 9″x12″
3 pieces Book paper 7 1/2″x9″, left from small pamphlet
1 piece Cover paper 9″x12″ 48″
Binders’ thread
Glue
Rule, pencil, scissors
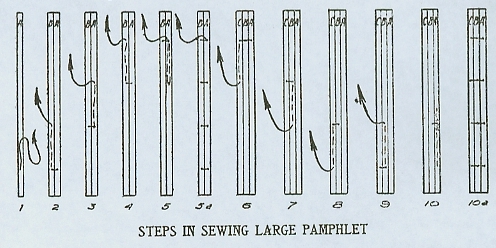
Lay out and cut six pieces book paper 7 1/2″x9″, and use the three additional pieces left from the small pamphlet Fold, sew, glue, and letter as in small pamphlet, using three pieces of paper to each section.
NOTE A thicker pamphlet may be made by adding extra pages as shown in the following drawing.

313. Sewed Pamphlet with Reinforced Back
1 piece Heavy cover paper 6″x9″ 3 pieces White book paper 6″x9″
1 piece Binders’ cloth 1 1/2″x6″ 20″
Thread
Glue
Rule, pencil, scissors, needle
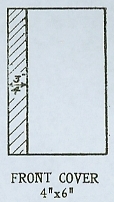
DIRECTIONS
a. Cut heavy cover paper 6″x8″ for cover, and fold to 4″x6″ b. Cut three pieces white book paper for leaves, c. Fold each piece to 3 7/8″x5 3/4″ d. Sew leaves together same as in number 312 e. When leaves are sewed and fastened in cover, glue strip of binders’ cloth around back of pamphlet ancl place under weight until dry
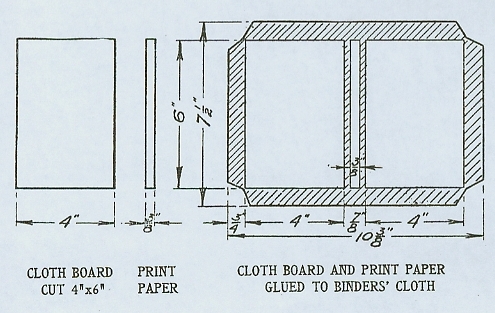
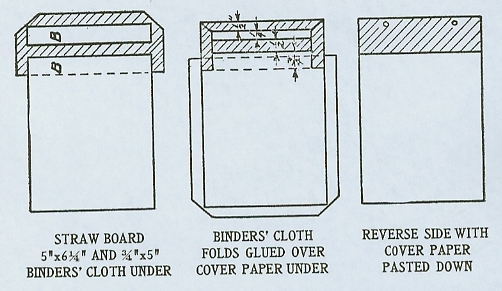
314. Cloth Covered Portfolio
2 pieces Straw board 4 1/2″x7 3/4″, cut from 6″x9″
1 piece Binders’cloth 9″x 12″
1 piece Marble paper 9″x 12″
Glue, paste
Rule, scissors, pencil
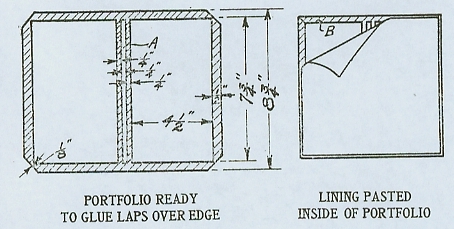
DIRECTIONS
a. Cut binders’cloth 8 3/4″x10 3/4″ b. Locate pieces of straw board on binders’ cloth, leaving 3/4″ between them as indicated on the drawing and draw line around each piece c. Spread a thin coat of glue or paste on one side of binders’ cloth and press straw board firmly into place on the cloth In applying glue, use thin piece of soft wood or stiff piece of cardboard. Paste will be found easier to use. d. Cut off corners of binders” cloth leaving 1/8″ to fold up over the corner of the strawboard e. Glue strip of scrap papeir in the middle of back as indicated at A, 1/4″x7 3/4″ f. Spread glue on edges of cloth and fold over straw board,see B Do not use paste here g. Cut marble paper 7 1/2″x9 1/2″ for lining h. Paste in place over strawboard While paste; is drying press firmly in grooves
NOTE This portfolio is to be used in carrying folded papers. It is a first step in case making for book binding. The small sewed pamphlet, number 312, involves the sewing of several sections, and the cloth bound book, number 31 6, shows the fastening of the sections into the case.
315. Glued Booklet
1 piece Heavy cover paper 6″x9″
4 pieces White book paper 6″x9″
Glue
Rule, pencil, scissors fold to fit
DIRECTIONS
a. Cut 4 pieces book paper 5 3/4×8 3/4″ b. Fold cover to 4 1/2″x6″ c. Fold leaves to fit cover d. Run a little glue on the folded edge of one of the folded sections and insert it in the cover. Repeat the process with the other sections, placing each one in the preceding one (See cut) e. Keep folded and place under a weight until glue is dry
NOTE Several pieces of book paper may be placed side by side, instead of one in the other, and then all glued into a double creased coveir as here illustrated.
316. Cloth Bound Book
1 piece Cloth board 9″x 12″
1 piece Binders’ cloth 9″x12″
2 pieces of Cover paper 9″x12″
1 piece of Canvas for backing 3″x9″
1 piece Print paper 3/8″x9″,
1 piece Print paper 1/4″x9″,
20 pieces Print paper 9″x12″
Instead of 20 pieces of print paper 9″x12″, anywhere from 9 to 36 pieces may be used according to thickness desired and time available. This will provide for from three to six sheets to a section, and from three to nine sections, Glue and paste 60″ Binders’ thread To be varied for a greater or less number of sections
Rule, pencil, scissors, needle, knife, cutting board
A piece of Binders’ board 9″x11″ will be found satisfactory for a cutting board

DIRECTIONS
a. Make case for book same as number 314, omitting the marble paper used for lining b. Lay out and cut 9 or more pieces of print paper 7 1/2″x9″, and fold to 4 1/2″x7 1/2″ c. Put three or four sheets to a section, one folded inside of the other, and sew the sections together as in number 312 If larger paper be used,, fold It as illustrated in number 217 on pages 31 to 36 d. Glue strip of canvas backing, cut to 2 1/2″x7 1/4″ against sewed edges, press the 1/4″ strip of paper against the glue as it is forced thru the canvas Allow to dry with paper attached as shown above e. When dry (next day) glue these canvas projections to the inside of covers Press firmly with one hand against a piece of scrap paper while holding the leaves of the book straight up from the covers f. Insert a piece of scrap paper between covers and end sheets at both front and back of book, close the book, and put under pressure for a few minutes, or until next day Be sure the back of the book is smoothly rounded g. Cut two pieces of cover paper for lining, 7 1/2″x9″, or of such size as will fit properly, and paste against inside of cover and for a quarter of an inch up against the end leaves of book Put under pressure of heavy books or into a letter press h. When dry, ithe outside of front cover may be decorated by a simple outline in water color
NOTE Writing paper, drawing paper, or manilla paper may be used in place of print paper, and any number of sections may be used, or several printed pamphlets may be sewed together. Economy or material and ease of manipulation will require that not over three or four sheets be put into a section and that not over five sections be used. If hand screws or vises be available, the back of the book may be rounded with a hammer as shown in the illustration at the right of the lower row. This form can be suggested by working with the fingers. It provides a place for the sewing, and allows the covers to lie evenly, It may seem desirable to start with a smaller book and make two books, or to omit the larger book altogether.
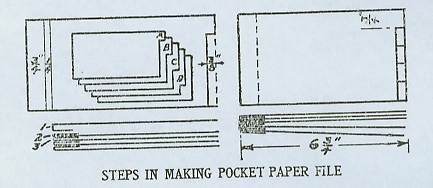
411. Pocket Paper File
DIRECTIONS
a. Cut 5 pieces of tag board, each :
b. Lay out and cut tabs, A, B, C, D, as indicated in the small scale drawing on front cover at left Each tab is to be made 3/4″ longer than the one above it
c. Fold one piece for the cover as indicated in the lower drawing at the left, 1
d. Fold the other three pieces as shown in the lower drawing, 2 and 3
e. Glue folded part of No. 2 into No. 1; folded part of No. 3 to No. 2, and so on until all are glued together
f. Fold the top piece around the others and glue
NOTE Measuring, folding, and gluing must be accurately and carefully done or the edges of the finished file will not be even.
412. Desk Paper File
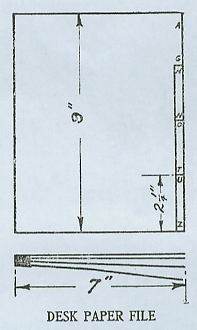
4 pieces Heavy tag board 9″x12″ Glue Rule, pencil, scissors
DIRECTIONS
a. Cut 4 pieces 8 1/2″x9″
b. Lay out and cut tabs in same manner as in number 411 Tabs are to be made 3/8″ ‘wide and 2 1/4″ long
c. Fold each sheet 7″ from tab edge. The top sheet which is to fold around the others will require a second fold the same as in number 411
d. Letter or number the tabs to be used for markers One suggestion is given in the above drawing
e. Glue together and put under a heavy pressure Follow the same order as in number 411
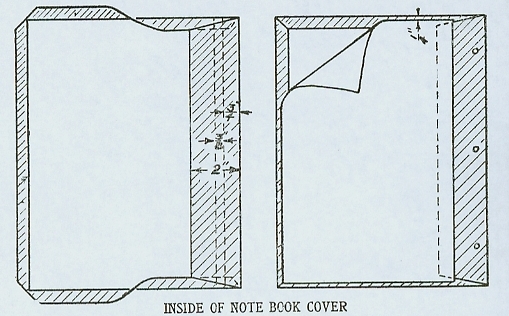
413. Note Book Covers
A.OPENING BOOK COVER
2 pieces of” Straw board 6″x9″ 2 pieces Binders’ cloth 3″x6″
2 pieces Heavy cover paper 6″x9″
2 pieces Marble paper 6″x9″
Glue, paste, eyelets
Rule, pencil, scissors,, eyelet punch, knife
a. Cut one piece of straw board 5″x7″ and cut strip from end 3/4″x5″ These two pieces are to be fastened to binder’s cloth as shown in the first drawing
b. Cut one piece of binders’ cloth 2 1/2″x6″ This is to be used as a hinge for the front cover
c. Place the two pieces of straw board 1/2″ apart over binders’ cloth as shown at B B Draw lines on cloth to indicate exact position of pieces of straw board and cut corners as illustrated
d. Spread paste or glue on binders’ cloth where it is needed to fasten to boards Use a brush for paste or a clean piece of wood with a chisel edge for glue
e. Place pieces of straw board as indicated by the lines on the cloth and press firmly Put in press if one is available
f. Apply glue to edge of cloth and fold over the straw board. Put under weight until glue is set
g. Cut one piece of heavy cover paper 6″x7″ This is for the outside of front cover
h. Apply paste to heavy cover paper and set in place on the straw board See second drawing above
i. Fold edges over straw board and fasten with paste or glue Outside of cover is shown in third drawing above
j. Cut one piece of marble paper 4 3/4″x7 1/2″ This is a lining to the front cover
k. Paste marble paper in place This should extend over the edges of the cover paper and to 1/8″ from edge of boards
l. Punch holes and set eyelets near the edge This is shown in the drawing at the right
NOTE The back of the note book cover is made in the same manner as the front except that the straw board is in one piece and there is no hinge. If desired the back can be made hinged the same as the front. To do this it is necessary to have two strips of straw board as at B instead of one. The back must be made the full size of the front, including hinged end.
B. SIDE OPENING NOTE BOOK COVER
2 pieces Straw board, 8″x10 3/4″, cut from 9″x 12″
2 pieces Binders’cloth, 12″x12″
2 pieces Marble paper, 9″x12″
Glue, paste, 6 eyelets Rule, pencil, scissors, eyelet punch, knife
DIRECTIONS
a. Cut each piece of straw board 3/4″ from one edge
b. Cut two pieces of binders’ cloth each 11″x12″
c. Locate straw board on binders’ cloth
d. Apply glue to straw board and press in place on cloth If easier apply glue to binders cloth
e. Cut corners of cloth within 1/8″ of straw board
f. Fold edges and glue Wide lap on hinge should be folded after top and bottom are folded
g. Cut two pieces of marble paper 8″x10 1/2″
h. Paste marble paper in place
i. Punch holes and set eyelets as indicated in drawing
414. Portfolio with Cloth Corners
2 pieces Cloth board 9″x 12″
1 piece Binders’cloth 3″x 12″
1 piece Binders’ cloth 5″x5″
2 pieces Marble paper 9″x12″
1 piece Marble paper 1 1/2″x12″
Glue and paste
 Rule, pencil, scissors
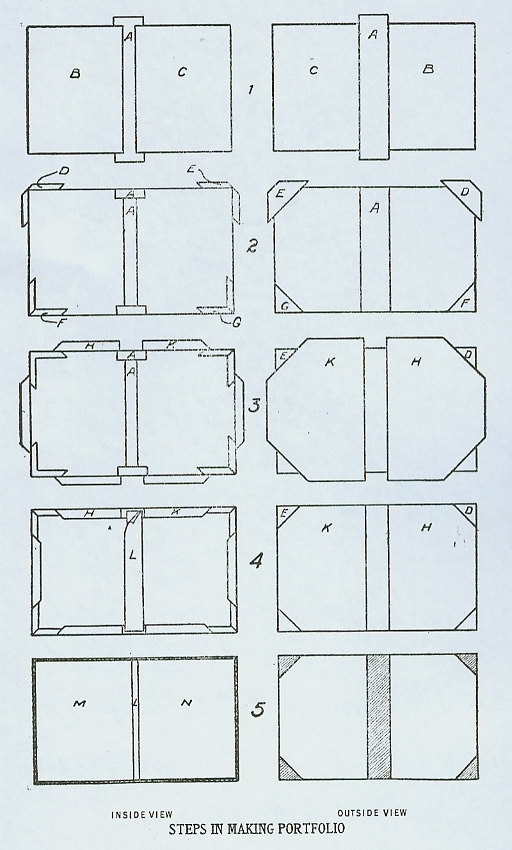
DIRECTIONS
a. Cut binders’ cloth 2 1/2″x12″, from piece 3″x12″
b. Cut two pieces cloth board 8″xl0 1/2″ from 9″x12″
c. Glue cloth board, B, C, to binders’ cloth, A, as shown at step 1
d. Fold cloth over top and bottom and glue down flat, cut four corners of binders’ cloth, D, E, F, G, each five inches along the slant line and glue in place as shown at step 2
e. Cut two pieces cover paper 8″x12″ with two corners of each cut away 3 1/2″x3 1/2″ and paste over back of portfolio, lapping over cloth back at center a fourth of an inch, as shown at H, K, in step 3
f. Paste laps of cover paper inside, and paste strip of marble paper l 1/2″x10 1/4″ over center inside as shown at L in step 4
g. Paste sheets of marble paper 8″x10 1/4″ over inside of portfolio as shown at M, N, in step 5
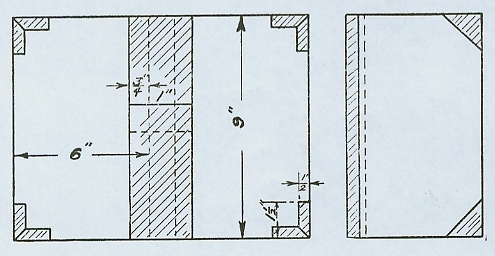
NOTE This may be used in carrying drawings or written work, and may be made in a variety of sizes. The following drawing illustrates another way of fitting the corners: cover with corners In this portfolio a heavy gray cover paper for the body and a darker gray for the corners and back makes a very satisfactory combination. Light gray may be used for the lining or marble paper may be used. The order of procedure is as follows:
a. Cut one strip of dark gray paper 2 1/2″xl9″ One strip 2 1/2″x12″and one 2 1/2″x8 1/2″ will answer if the long strip in not available
b. Paste this strip around the edges of the straw board to form the hinged back of the portfolio
c. Make four corners from one piece of heavy cover paper 4″x4″ or 5″x5″ For method of making these corners see number 433, or number 414
d. Fasten corners with paste or glue In place of putting corners on at this stage, it is possible to put them on after step “f” and leave them unpasted over outside of cover
e. Cut two pieces heavy cover paper 6 1/2″x10″ for outside of covers
f. Cut corners,, fold edges over straw board,, and paste as in steps 3 and 4, page 51
g. Cut two pieces of thin gray paper each for lining h. Paste lining in place.
415. Bound Scrap Book
2 pieces Straw board 6″x9″
1 piece Binders’cloth 10 1/2″x14 1/2″
1 piece Colored cover paper 9″x12″ 3 pieces Gray cover paper 9″x12″
1 piece Canvas for backing 3″x8 1/2″
Glue, paste Rule, pencil, scissors
DIRECTIONS
a. Cut the three sheets of gray cover paper
b. Fold these and fasten them together the same as in number 311 for the body of the book The folds in the middle of the sheet should be only 1/4″ apart and the finished pages should be 5 3/4″x8 1/2″
c. Glue strip of canvas to the back of the book, as in number 316. Place a narrow strip of paper upon the canvas to take up the glue as it comes thru
d. In making the cover use the same method as in 316
e. Set the body of the book in the cover and put in the fly leaves as in number 316
NOTE The boards may be covered with paper instead of cloth and it may be made with or without corners. 416. Bound Drawings 2 pieces Heavy cover paper Size to suit the size of drawing paper used Crochet cotton Rule, pencil, scissors, needle
BOUND DRAWINGS
DIRECTIONS
a. Lay off points on one end of the cover for the punching of the holes These holes should be about one inch from the end and about three-fourths of an inch apart
b. A neat and firm method of sewing is shown in the drawing at A
c. Title may be written or printed on the front cover
NOTE This problem is given as one of the ways of putting into neat and permanent form the drawing plates that the children have made in their drawing lessons. These drawings should be selected and arranged according to the drawing subjects.
417. Rebound Book or Bound Magazines
This work may be given in the fourth grade but is rather too difficult there. It is more suitable for fifth and sixth grades. If this work is attempted in the sixth grade the book may be taken apart in sections and re-sewed. Then it is bound as the bookbinder would bind it. For the fifth grade the following is suggested:
DIRECTIONS
a. Remove the cover of the magazine and apply a little paste to the back of the magazine to loosen the bits of paper and glue which remain
b. Glue strip of canvas on back in same manner as in number 316
c. Make a cover similar to that in number 316
d. Set book in cover and glue the canvas to the boards only
e. Paste in fly leaves and put in press
NOTE Below is illustrated the arrangement of book problems as planned for the first four grades. Names, numbers and sizes are indicated lor comparison and quick reference.
