
THE ART CRAFTS FOR BEGINNERS BY FRANK G. SANFORD
DIRECTOR OF ARTS CRAFTS, CHAOTAUQUA, N. Y.
ILLUSTRATED WITH WORKING DRAWINGS BY THE AUTHOR AND PHOTOGRAPHS
NEW YORK: THE CENTURY CO. 1913
THE modern revival of bookbinding in the spirit of thoroughness of the medieval craftsman, is engaging the attention of many amateurs at the present time so that no book on the art crafts is complete which does not treat of the subject to some extent.
To do the work thoroughly requires an equipment large and expensive in comparison with the other crafts, and to do it in a makeshift way is most unworkmanlike. The best we can do with our limited space here is to give the student some suggestions for simple work such as can be performed by beginners, and then to explain, as clearly as is possible in print, the “forwarding ” and “finishing ” of a book in the best method of the craft.
Let it be understood from the first that we are considering special binding in contradistinction to trade or commercial binding. The directions that follow are as clear as words and working-drawings can make them; but the reader will come to a better understanding of each step of the work of bookbinding by taking apart an old copy of a hand-sewn book and comparing it with the diagrams and the printed instructions.
A visit to a neighboring bindery will also prove of practical interest. Magazines in general, particularly the ten-cent variety, are as a rule hardly worthy of the immense amount of time required to do special binding. If one’s time is valued at anything one cannot afford to undertake the work when a commercial binder will bind, and bind well, for a dollar or less a volume. On the other hand, if you have a first or old edition of some standard or really good piece of literature, in which paper, type, and other features are worth good binding, and which may need careful thought and patient mending, you may not care to intrust such a volume to the trade binder; and you may find it a labor of love to undertake the job of binding it yourself.
A simpler and less trying piece for a beginner would be a book obtained from the publishers in sheets, if possible. This will avoid any mending, and will allow one to start with the first step in binding, thus saving the work of undoing the original binding. In selecting such a book good hand-made paper, correct margins, and satisfactory presswork in every detail should be insisted upon, and the subject-matter of the volume assuredly should be of intrinsic merit. If we wish to emulate the craftsmanship of the medieval binders, nothing but the best material and most thorough methods will suffice.
For the special binding of books, at school or in the home, the following equipment , which is kept as simple as possible, will be required. In some cases ingenious and efficient substitutes may be found to take the place of articles named. Any article on the list with which the reader is not already familiar may be obtained at any bookbinder’s supply store.
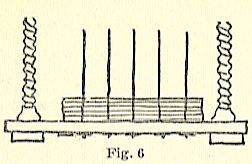
Sewing-frame (Fig. 6).
Pressing-boards.
Backing-boards.
Tins for pressing.
Celluloid sheets.
Letter-press (ordinary office press).
Finishing-press. Lying- or cutting-press.
Plow.
Carpenter’s square.
Dividers.
Straight edge or metal ruler.
Awl. Backing-hammer (Fig. 12).
Paste-brush. Ivory or bone folders.
1 ordinary cutting-knife.
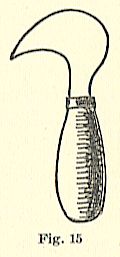
2 knives for paring leather (Fig. 15).
Band-nippers.
Band-stick.
Knocking-down iron, also used as weights for less heavy pressing. The actual knocking-down iron cannot be had in this country: a handleless flat-iron or other substitutes must be used.
Forwarding a, Dummy Book.
By “forwarding,” in bookbinding, is meant all the steps toward the completion of a book, up to, but not including, “finishing,” or the lettering and decoration of the same. A wise and eminently safe beginning in bookbinding is to practise first on a dummy or blank-book. This may be planned, as to thickness and dimensions, to meet the requirements of a journal, guest-book, or scrap-book, as the case may be. The quality of paper used will depend, of course, on the nature of the book. Ordinarily, you will do well to select a medium-grade cream or white and a medium size paper. Artist’s charcoal-paper is excellent. These sheets will be possibly eight times the size of the book determined upon. Now carefully fold and cut once, then refold and cut each half until double the size of the final page is obtained. Sections will be made up of from three to eight folded sheets, depending on the weight and bulk of paper, and as many sections used as may be desired. A book of medium thickness is somewhat easier to handle, as well as more quickly sewn. These sections, with the ” end-paper” sections, must now be pressed between pressing-boards and tins, in the letter-press, preferably over-night.
End Papers.
The “end-papers” are blank sheets occurring at the front and back of the book, and are not only a protection to it, but also help to give it a respectable appearance, and should be generously allowed for. Always three or four endpapers, not counting the paste-downs, are to be found at either end of a book, and are prepared as follows:
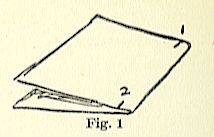
Take two carefully folded sheets of paper slightly larger than the book, mark them with dividers, 1″ from the back, near the top and bottom (Fig. 1), and paste the second folded sheet to the first as far as these points (Fig. 2), and then press.
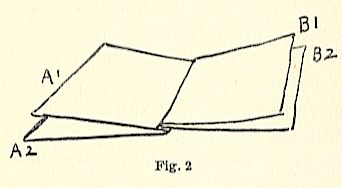
When the paste is quite dry, fold Al back over Bl, and A2 the reverse way, when the sheets will appear as in Fig. 3,
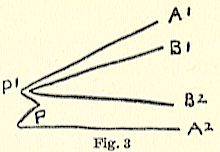
Another folded sheet is inserted at P, and the sewing passes through this, as well as through B1. “When the paste-down Bl is to be pasted down to line the inside of the board, the waste Al is torn out. This joint, known as Cockerall zigzag, is necessary to give a spring to the board and to pre-veut its tearing the end-paper away from the Fig. 2 book. These two sections of end-papers must be pressed with, the book before sewing.
Marking – up.
– ” Marking-up” consists in determining and marking across the back of the sections the position of the sewing-cord. These are usually five in number, though they vary with extreme sizes of books, at the discretion of the binder. Divide the back of book with dividers (beginning at the head) into six parts-five equal ones, with that at the tail slightly greater. Having determined the position of the cords, draw heavy pencil-lines across the back, marking every section.
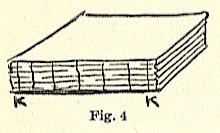
Mark the position of the kettle-stitch (or catch-stitch) about half an inch either end (KK, Fig. 4). These are sawed or filed in to a depth of about one eighth of an inch. Sewing,-A. sewing-frame such as has been used certainly since the sixteenth century, and probably earlier, is shown in Fig. 5, and is still in use. .
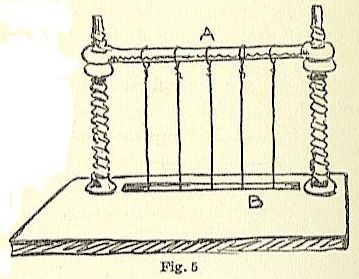
The best hemp cord should be used, the size varying somewhat according to the size of book. Five cords are now tied to A and fastened below B, 011 a special key made for that purpose. Or, as the keys are not easily obtainable in this country, a good-sized nail may be used, around which the cords are twisted and firmly tied (Fig. 6). Now adjust the cords to correspond to the marks on the book, and tighten them by screwing up the cross bar (Fig. 6).
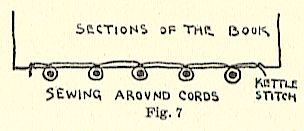
The book will now be sewn, beginning with the first section, which is laid face down, head to the right, back against the cords on a pressing-board which is larger than the book, and which raises the section from the bed of the frame and lessens the difficulty of inserting the needle. The needle, threaded with a good linen or silk thread, medium weight, is inserted from the outside first at the nearer right-hand kettle-stitch. . An end of,say two inches is left at this first kettle-stitch, to tie to later, and the rest of the thread pulled through. The needle is now in the middle of the section and will be passed out at the left-hand side of the first cord, the thread pulled taut, and the needle inserted again into the hole out of which it came, but from the opposite side of the cord, and so on around all the five cords, and finally out at the kettle-stitch at the foot (Fig/7).
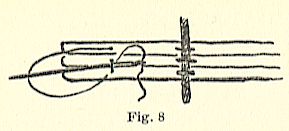
The next section is laid on and is sewn from foot to head, similarly,, after which the thread is tied to the loose end left at the first kettle-stitch. The third section is then laid on and sewn, but when its tail kettle-stitch is reached, the under thread eonnections? sections 1 and 2, are tied too, as shown in Fig. 8,
This kettle-stitch is repeated at each end throughout the book. When the last end-paper has been sewn on, a double kettle-stitch ismade, which completes the sewing. The cords may now be cut off leaving about three inches on each side of book, for fraying and later lacing into the boards.
Gluing-up.
– For this operation the best cabinetmakers’ glue is used, prepared in the usual way, having been soaked overnight and shortly before needed cooked in boiling water to a smooth, clear, rather thin consistency. A large brush of good quality is used. The book is knocked up squarely at the back and head, put between two pieces of millboard or old cloth covers, covering the cords, and screwed up in the lying-press, exposing the back only (Fig. 9).
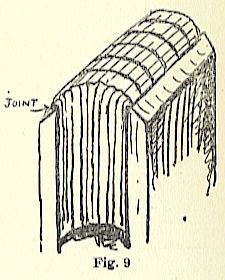
Hot glue is now daubed thoroughly on to and into the back of the book. The press . must not be screwed so tight as to result in the glue remaining entirely on the surface, nor left loose enough to allow of its penetrating too deeply between the sections. Before the glue has hardened, but after it has ceased to be “tacky,” the book is removed from the press and rounded, during which process the back is curved slightly and evenly. The degree of curvature will depend upon the natural disposition or tendency of the book, and partially as well upon the taste or wish of the binder. All books will be rounded somewhat, to prevent the possibility of their later becoming concave. Bounding consists in drawing the sections over and tapping slightly with a hammer, first on one side of the book and then on the other, resulting in an even convex fonn at the back and a correspondingly concave form of the fore edges of the book. In Sacking a book the rounding is completed, made permanent, and the book given a firm, smooth back. A backing-board is placed on either side of the book, back from the edge, just the thickness of the boards. This projection of the book will cause a joint, into which the boards should just fit. In placing boards and arranging for screwing up in the press, firm handling, endless pains, and no little patience are required. Frequently one or both boards slip, leaving a greater projection of the book at one end or side; this must be carefully avoided. When the book is ready, screw the press up very tight. “With a back-hammer-and it should not be a heavy one – proceed gently and cautiously to start the sections in the right direction, bringing them over from the middle each way. Then with heavier, firmer strokes go over the entire back, taking care that the joint is as sharply defined as possible. Fig. 9 shows the rounded back, and the joint is indicated by the arrow. Cutting and
Lacing-in Boards,
– A. good, firm mill-or tar-board should be used for cover-boards. Both come in several thicknesses, from which the binder will choose, according to the size of the volume in hand. First cut the boards roughly to size of the book, allowing, say, one inch beyond. Plow.- This is the binders’ cutting-knife, which is now employed to obtain the exact size and perfectly clean-cut, smooth edges. The two boards are placed in the cutting-press against a piece of stiff millboard, or against a piece made by pasting together two or three thinner pieces of millboard. The plow (with plough-knife extended about 1″ and screwed in) is placed in the groove of press provided for it, held by the hand and screw, and run slowly and smoothly backward and forward; a slight turn of the screw brings the knife forward. When the two thicknesses are cut through, remove the boards and line them.
Lining-up.
– With a piece of common white paper, line one side of each board. Paste Formula.-A. good paste may be made to use for bookbinding purposes, as follows: 1 pound of flour (two cups) ; 2 teaspoons of alum, dissolved. Mix the flour with a little cold water, getting the lumps out with the hands. Add 8 cups of hot water and boil, stirring constantly. This becomes partly clear when done. Add 1 teaspoon of essence of wintergreen and sassafras, which helps keep the paste sweet. The paste is to be used cold, and applied with a large brush. Cover the lining-papers evenly, and as thinly as possible. Place on the board to be lined, and rub perfectly smooth, using the palm of hands and folder. Be sure to have both the inner and double lining-papers pasted down uniformly and perfectly smooth. The lined covers should be pressed for a few moments only, and then stood up to dry. Now if the boards are dry, continue cutting them in the plow down to the size of the book. Decide upon the square or projection of board beyond the leaves of the book, usually 1/8″ or less if the edges are plow-cut; more if they are rough or deckled. Mark this square accurately, using dividers and try-square. Place in the press with double linings together, and cut to the marks with plow. Test again with the try-square, and by reversing the position of boards; then mark and cut the remaining sides. When perfectly square, and of the required size, place the boards on the book in their final position, hold firmly in place with the left hand, and with the right mark accurately the position of the cords on the back edge of the board.
Lacing-in Boards.
Remove the book from the press and finish fraying or thinning the cords. Use a knife for thinning or reducing the cords equally, but leaving them strong and long enough to hold the covers on to the book. Mark both boards, and then cut accurately a V-shaped groove or depression back to a line drawn about 1″ from the edge of the board (Fig. 10). Into these depressions the cords will fit.
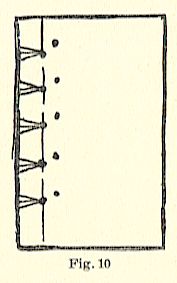
With hammer and awl two sets of holes are punched-the first set at the point of the V-shaped cut, and the second just above and inward from the first (Fig. 10); punched from the board at a These holes just large enough serting the now smeared twisted to a Lace on one the five cords of holes (Fig. cords through Pig. 10 these last to be the under side of slight angle, must be only to allow for in-cords, which are with paste and point. board, inserting into the first set 11, a).
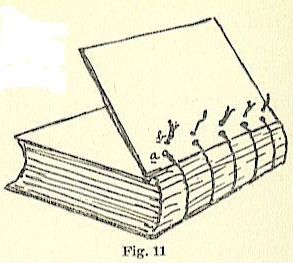
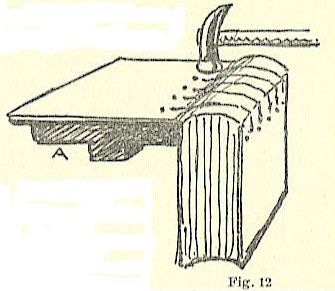
Draw them firmly, and return them through the second set at 5. The board should close down to the book stiffly if the lacing is snug enough. Lace in the other board, then tap the cords slightly with a hammer to prevent their slipping, and cut off the ends with a knife very close to the book. A knocking-down iron (Fig. 12, A) is placed in the cutting-press and the lacings or cords hammered vigorously, matting them into the boards and leaving a smooth surface inside and out (Fig. 12),
The book must now be pressed. Put a tin inside and outside of each board: the ones between the board and the book must be pushed quite up to the joint, and the outside tins placed up to, or a little over, the same. While in the press paste is applied to the back of the book and allowed to soak in for a few minutes. This softens the surplus glue so that it may now be scraped off with a palette-knife or a piece of wood. Leave the book in the press over night at least, after which it is ready for the head-bands.
Head-bands. -Cut two narrow strips of vellum, not quite as wide as the projection of boards, and about an inch longer than the book is thick. These are to be buttonholed with silk upon head and tail of the book at the back. Stand the book in the finishing-press (Fig. 13), v indicating the position of the vellum.
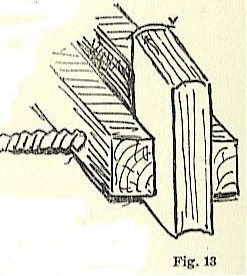
Thread a needle with medium-heavy silk thread or floss and sew in the direction of the arrow, through the first two white end-papers, the needle coming out at the back of the book below the kettle-stitch. Come up over the vellum and repeat this first stitch, in the same place making a loop of silk over the vellum. The silk is pulled through the needle half and half, one half being now at the back of the book and the other half in front, on top.
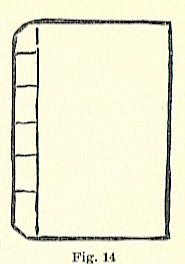
Bring the thread from the back forward, and that from the front backward, crossing the other and passing under the vellum and forward again. This makes a buttonhole twist covering the vellum. Repeat, keeping the threads taut and the stitches close together, and the beading even and regular. At frequent intervals-about every half inch-the book is again sewn into below the kettle-stitch. Finish the head-band, when the last section is reached, by sewing down between the last end-papers, tying threads securely at the back of the book. Then cut off the surplus vellum and thread. The silk is kept from a possible slipping off the ends of the vellum by a slight touch of paste. One must have studied the head-bands of a hand-bound book to know the effect desired, as it is most difficult to explain in words, or even with the aid of drawings. The head-bands are held in place and reinforced by gluing to the back of the book a piece of good paper cut just to fill in the space between head or foot and the nearest cord, and just the width of the book. Preparing for Covering.-After sandpapering away any possible roughness which may have been left from the glue or from other causes, and cutting off a tiny triangle from the four back corners of the board (Fig, 14), the book is ready for the leather.
The leather used for covering will probably be Morocco or Levant, possibly Niger. In any case the first quality should be used, and as some experience is required before one can become a good judge of leather, he will do well to patronize only a thoroughly reliable dealer. The skins may be purchased already pared little or much. It is dangerous to get one too thinly pared, for though it lessens the labor of the binder, it certainly weakens the leather. Better select a thicker skin and do the necessary paring where it is required, particularly around the edges and also through the center portion which is to cover the cords or back of the book and for this reason must be thin and flexible.
Paring.
-A lithographers’ stone is convenient to pare on, though a marble-topped table, if you have one, will do nicely. Various paring-knives are shown by the dealers, and binders use different styles. I recommend a small saddlers’ knife, such as is shown in Fig. 15, and this must be kept very sharp.
Cut from the hide a piece of leather large enough to cover the entire book in hand, allowing an inch on all sides for turning in ; and pare the whole edge for an inch at least, inward. It should be very thin at the extreme edge. Coarse sandpaper may be used to good advantage after a very little paring has been done, especially in the middle part of the leather, working from top to bottom.
Covering.
-Whatever is to be used in the work of putting on the leather should be at hand before the covering is started, including paste, brush, paste-cloth, folders, nickeled band-nippers, band-stick, clean sponge, a little water in saucer, and celluloid or waterproof sheets the size of the book. The leather is now covered uniformly with paste, which must be smooth and perfectly free from lumps. The back of the book is placed in the center of this pasted leather, the inch margin left at head and foot. Bring the leather up on the sides, pull slightly, and rub perfectly smooth with the palms of the hands or bone folders. Stand the book upon its fore edge and nip up the bands with the band-nippers, working down the leather between the cords with the band-stick-a bit of smooth, hard wood with straight edges.
Much time and pressure are required in this operation, and we shall return to it later. Before the paste is too dry the leather on the head and tail must be turned in, and then the leather on the fore edges, and the corners mitered. Especial care must be taken to have a sharp, smooth edge. At the head and tail a little paste will be needed on that part of the leather which will turn in behind the head-bands. This fold of leather behind the head-bands is brought forward slightly and tapped down to form the head-cap, partly concealing the head-bands. Now open the covers one at a time and cut off the extra leather at each corner, tucking one edge neatly under the other. Insert the celluloid sheets between the covers and the book, to prevent dampness being absorbed by the latter. Close the volume and stand it on its fore edge, holding it firmly while the process of nipping up the bands and smoothing down the leather between them is completed.
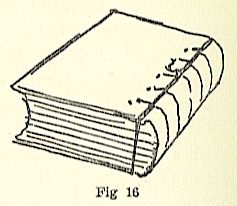
A piece of cord is tied around the book at the back (Fig. 16), causing the leather to adhere tightly, and accentuating the joint caused by the slight cutting away of the corners at the back. The book is now left under slight pressure until perfectly dry.
Assistant Finishing.
-Trim the leather neatly to an even margin on the inside of the covers, tear out the waste end-paper, and line the board with the “paste-down” provided in the end-paper section.
Finishing.
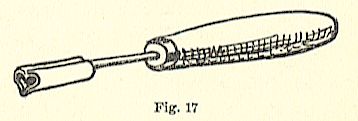
-The decorating and lettering is usually done by means of tools ; and the process is technically known as “tooling.” These finishing-tools are stamps of metal held in a wooden handle. A unit of a design, letter, or other device is cut in this tool-metal (Fig. 17).
Tooling may be either blind or gold; the first consisting of the mere or blind impress of the tool upon the leather, while in the latter, as you may infer, the gold-leaf is added, The possibilities of tools -their use in most elaborate combinations and designs-is very great, but I shall undertake to describe only the simplest method of finishing a book in this way, and the steps involved.
Tools.
-At least two sizes of letters, both caps and lower-case, must be owned by any finisher. Fillets, or wheels on handles, for making lines, several gouges or curved-line tools, as well as a few simple units, such as dots, leaves, or other standard forms, may be purchased at first, and later added to with tools of one’s own design, cut to order as they are needed.
For the book in hand only three tools (besides letters) are required: the fillet, a small leaf, and tiny gouge. It is a small volume and thin-so thin that the title cannot go comfortably upon the back; hence I must decide where to put it on the side and plan the decoration with reference to this panel of lettering.

No more simple scheme could be devised than that shown in Fig. 18 with the panel of lettering across the top, and an “all-over” pattern filling the remaining space. Diagonals are first drawn and the leaf, with the tiny gouge forming the stem, placed at each intersection. The title is in gold and the rest in blind-tooling.
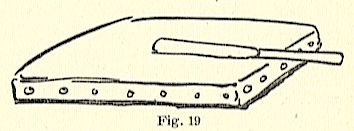
A piece of thin bond-paper is cut just the size of the book, and upon this the panel for lettering is planned, border lines and diagonals drawn. The leaf- and stein-tools used are slightly blackened in a candle flame and impressed upon the paper at the diagonal intersections. This pattern is then lightly pasted to the leather at the four corners of the book, and the heated tools applied. Tools are heated on a finishing-stove or iron frame which will support them near a gas or other flame, A wet sponge in a dish is used as a cooling-pad, and upon which the hot tools are tested. They should hiss slightly and should “be too cool rather than too hot, as the impression may be deepened after removing the paper. The title to be finished in gold must be painted in ” glaire.” Finishers glaire is made by beating well the white of an is egg, which is then diluted with half the quantity of vinegar and allowed to settle. The cover is then washed with thin paste-water, then the glaire is applied to the blind impressions which are to be covered with gold with a small finely pointed brush. When glaire has ceased to be “tacky” the gold-leaf is laid on. Gold-leaf may be purchased in booklets containing a dozen or more small sheets. Only the best quality should be used. Gold-leaf is difficult to handle-almost impossible if there is any draft present or grease on the cushion or knife (Fig. 19). A strip of gold-leaf as wide as the letters are high and long enough to cover three or four is cut on the cushion of chamois-skin (Fig. 19) and transferred by means of a bit of slightly oily cotton to the letters.
The heated tools are again applied over the gold. Before using any tool it should be rubbed off on a strip of leather provided for this purpose, to insure cleanliness and to polish the end slightly. Often two or three or four thicknesses of gold are required before the pattern, or in this case the letters, are uniformly covered. When the tooling is finished and the surplus gold removed with a bit of cotton the book may be washed with benzine to remove any grease or soil. This completes the processes without going into more complications.
The reproductions of work here given illustrate the possibilities of combining simple units into patterns. The craft is very thoroughly discussed in “Book Binding and the Care of Books,” by Douglass Cockerell. Other books of interest to the amateur binder are:”Book-Binding.” Hone.
” Book-Bindings – Old and New.” Matthews.
” History of Book Binding.” Brassington.
Turning now from the constructive or craftsman side of bookbinding to the esthetic or fine-art side, we find that, broadly speaking, there are two schools of designers. On the one hand we find those who hold that the binding of a book is a thing of beauty, complete and satisfying in itself, just as a picture is complete,-a thing designed without necessarily having any reference to the subject-matter of the book ; and, on the other hand, we have those who believe that the decorative motive of the cover should be subordinated to the character of the contents-like a page standing, as it were, without an entrance and wearing the livery of the master within.
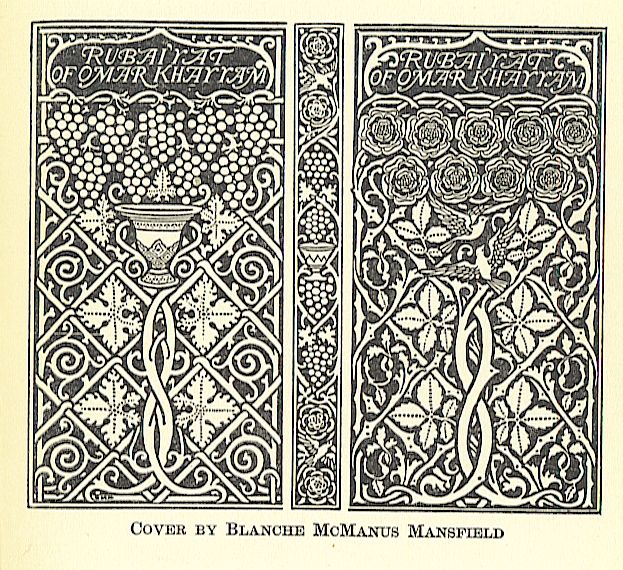
COVER BY BLANCHE MCMANUS MANSFIELD
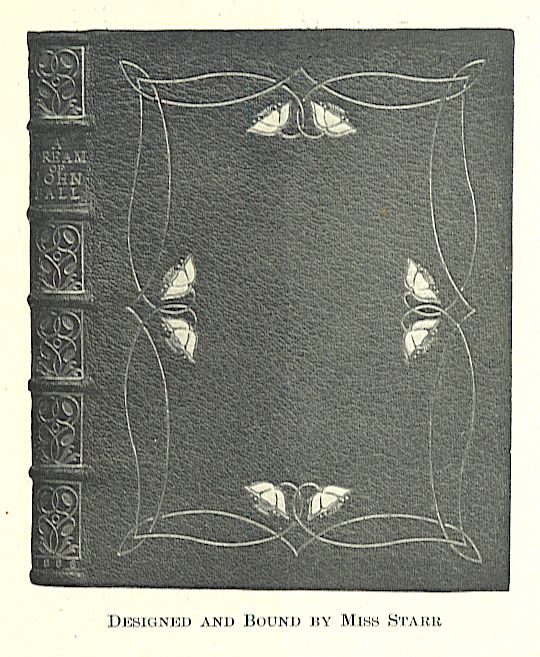 DESIGNED AND BOUND BY Miss STARR
The beautiful bindings of Miss Starr and Mr. Verburg here shown are of themselves excellent in design and workmanship; whether they typify the highest art of the craft or not is to revive the old, old controversy between the idealist and the realist – abstract beauty or concrete development of character.

DESIGNED AND BOUND BY PETER VERBUBG