
Bookbinding by
FREDERICK M. OLDACH
Philadelphia
FEW CENTURIES ago a small minority of the people of the civilized nations were in possession of books. At the present time, books have become a household necessity for the great majority of the people. By new methods, improvements and inventions of machines, the making of books in larger quantities has become possible and has reduced the price so much as to bring them within the reach of everybody. The selling of books through book agents has served to introduce books into houses where they were not appreciated before, although this method of selling books may be very objectionable. Now many persons consider good books the most profitable investment. After their books have served as educators and entertainers, they remain the same without depreciation of value. It is reasonable that persons who have such good books, wish to have the friends of their leisure hours clothed in accordance with their appreciated value, and so the bookbinder’s skill and experience is called into service.
It has always been the ambition of some of the young bookbinders to make themselves masters of their trade by steady, industrious training, and many of them have become binders of repute, and some, even art bookbinders. From centuries back to the present time, some of these art bookbinders have left us specimens of their work, which we find in museums and collections, and which serve to teach and inspire those of our young craftsmen who feel the desire to excel as masters in their profession and who have that love for their work which is necessary to make it at the same time a pleasure.
Bookbinding is very interesting. The subjects to be treated are so numerous, there is such a variety of them inexhaustable. The materials that can be used and have been used, are taken from all the kingdoms of nature, and used in so many different ways and forms, sometimes with difficulties which only patience and experience can overcome.
To become a practical and competent job bookbinder, the pupil has to commence at the beginning; that is, to learn all that is necessary to make a book out of the sheets; to fold them, plate, mount, mend, size and sew them. To make a good book, every particle of work has to be done in the best manner, and therefore, every part of the work is worth being considered important. If any part of the work is done carelessly and imperfectly the whole work is damaged by it, notwithstanding all the other work may be done perfectly.
Every job of any value should be laid out in all its details, as to general style of binding, the materials, colors, edges, ornamentation and especial features, so that every hand who has anything to do with it is fully acquainted with his part of the work. Old and rare books must be treated with especial care according to their condition. If they are to be taken apart, the back has to be soaked with thin paste to soften the old crust of glue, which has to be carefully scraped off and the sections taken apart. Some of the leaves may be torn, dirty, greasy and stained or full of mildew. In most cases the cleaning will be sufficient with warm water and Castile soap, and afterwards a bath in a hot size of glue and alum. About one ounce of the best glue is soaked over night, then boil in a quart of water, then add about a tablespoon full of ground alum and filter through a bag of coarse muslin. It must be used hot. If too strong, add more hot water to the size. Oil and fatty spots, if not too old, may be taken out with benzine.
It is not advisable to use any strong chemicals to remove stains; it will destroy the paper, especially of books which are not very solid. It is better to let remain what will not disappear by a milder treatment. Torn leaves must be mended and worm holes filled with a pulp prepared from paper of about the same quality and color, as the leaves. The paper for mending must be as near the same color as possible, and it may be necessary to stain some paper for that purpose. Coffee, tea or tobacco boiled in water will give such liquid. If leaves are torn into the print, small strips of thin tissue paper will answer to hold the parts together, but if there is space between the printed lines to permit narrow strips of the mending paper, the strips are not cut but torn carefully so the tear will form a bevel of fibers, and even if now and then a letter should be covered, that may afterwards be erased so the letter appears again. This is a little tedious, but a patient worker will make in this way a very satisfactory job.
Plates must be trimmed to the size of book, and if stiff, they are to be put on a narrow strip of muslin to be hinged over the section or leaf as it may be. Plates of ordinary paper are placed into their places so that all plates which face up (on the right side) have their legends to the front edge if the subjects of the plates are long ways, but if the face down the legends are towards the back of the book. It may be necessary, if some of the plates are smaller than the printed book, that they have to be inlaid on paper as large as the book.
The edges of the trimmed plates are to be pared, and so are the edges of the paper on which the plates are to be inlaid, so that the plates lay on a margin of the larger paper of about one-eighth of an inch all around. The papers have to be cut out for each plate before the inlaying is done with paste, and after inlaid put between clean paper and pressed. Some books are overloaded with plates, so much so that the printed sheets are not strong enough to hold them, and will, in a very short time break apart. In such cases the sheets have to be whipped or stitched after the plates have been placed in the sheets and afterwards sewed.
Very heavy plates must be guarded with a joint about one-half to one inch out from the part of the plate which goes in the back of the book. This strip is fastened with a strip of jackonette or fine muslin on the plate again, so forming a joint. The narrow strip is sewed with the book and after the book will be opened the plate will sag down from the joint. After the book is so prepared it has to be pressed to make it as solid as possible before it is sewn.
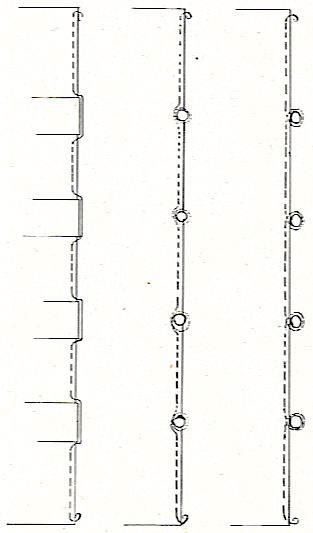
There are various ways to sew books. Blank books are mostly sewn on parchment strips or tape. The majority of the jobs are sewn on cords which are sunk into the back of the book by saw-cuts just deep enough to hold the cord. The sewing is done with flax thread of diiFerent thicknesses to suit the different thicknesses of the sections of the book and in one continuous length, commencing at the tail end of the last sheet and ending at the tail end of the first section (or sheet). The thread passes over the cords, and the head and tail stitches (kettlestitch) are slung around the former stitches as the needle comes out and before passing in the next sheet. This makes the book one solid piece. The flexible sewing is the best and most durable. That is, sewing around the bands, instead of passing over them. The bands lay across the back, divided in four, five, or more equal distances from each other, to form afterwards the bands on the bound book. Books sewn this way will generally be bound with a tight back, while books sewn on sunken bands are mostly bound with loose or hollow back. Some special jobs are sometimes sewn with silk. After the book is sewn it is ready to be forwarded. The work of binding is divided into two main branches, that of forwarding—the work of giving the book its form, and the finishing —the work of ornamenting same. Both parts are equally important.
It it is absolutely necessary that a job bookbinder should learn every part of the trade, and to be able to bind a book in a good style from the very beginning to the finish. Very few bookbinders can be found who are equally competent in every detail of the work. It will take a lifetime to gather experience and acquire skill enough to be a good, all-around worker, and not lose a love for the work.
Before the book is put into the hands of the forwarder it is fully decided how it is to be bound, and all the various items repeated so there will be no misunderstanding. The leather for the cover and its color is selected, the end papers to harmonize with same, also the head-bands. If the book has to have leather joints, then they have to be carefully pared, not too thin, but only enough to allow the boards to hinge easily on them.
After the leather joints and the end papers are put in the book, the back of the book is glued up with hot glue and rubbed in between the sections. When dry, the book is rounded and the grooves made on both sides of the back deep enough to be even with the boards which are to go on the book. This operation (backing) is done by placing the book between backing boards, which are beveled wooden boards about three inches wide, with steel face on one side which projects to the point of the bevel on the thickest side of the board. The edge of the bevel is placed on both sides as far from the book as the groove is to be deep and screwed up tightly into a laying-press, and with a hammer, striking the back gently from near the center to the edge on both sides until the grooves are formed. The operator can spoil the book by careless beating with the hammer, by creating wrinkles in the back which never can be gotten out again.
Now the boards have to be selected and cut the size the book is intended. Very thick boards are a nuisance and should not be used except where the size of the book demands a proportionate and heavy protection. Heavy boards on books will help to break the joints and destroy the book. The boards are laced on the book with all the bands (or cords) on which it is sewn, after the bands have been roughed and the twist taken out, through holes about one and one-half inches from the band from outside, and again sideways from the inside to the outside. After the laces are drawn tight the projecting ends are cut off and the laced bands are hammered down flat. If it is intended to have the edges of the book gilt or marbled, etc., it is necessary to cut the book. Some books have only the top edge cut and gilt, and front and tail edge roughed.
The cutting of fine bindings is done with the plow and press (a laying press with iron screws). The plow and press is not used very much except by job binderies. The worker marks off the points where he wants to cut the front edge, but he first cuts the top edge, drawing the front board as far down as he wants to cut from the top, puts the book between cutting boards into the press so that only the part to be cut off projects. The cutting with the plow is done with a pointed steel blade adjusted in the plow. By moving the same forward and backward, and every tiine giving a little turn to the screw of the plow to bring the knife closer to the cvit surface. The tail is cut the same way, but the front is a little different, as the round has to be knocked out of the book by beating the back against the cheek of the press and pushing at the head and the tail a piece of steel plate about one and one-half inches wide and about six inches long, between the back and the boards, to keep the book flat until tied in that position or until cut.
After the book is cut the edges are the next operation. There are very many different kinds and methods of ornamenting edges. Gilt edges are best to preserve the book and at the same time the best ornament in their plain richness. All good books should have gilt edges. To gild the edges, the book is put between gilder’s boards (boards about three to six inches wide and nine to fifteen inches long, beveled) in the gilder’s press; a very heavy laying press, with iron screws, laying on a strong frame box.
The edge of the book is to be even with the boards and scraped to make it perfectly smooth. After having been sized with plain corn starch paste, or any other size, as boiled parchment chips, the size of which mixed with colors is rubbed dry with soft paper shavings. The size used to make the gold stick, is glair (the white of an egg) diluted twelve to fifteen fold with water and beaten to a froth. After a few hours the glair will be settled and ready to be used. Cleanliness is essential to make a clear edge. The gold used is the best gold to be obtained, about twenty-three carat. It is cut on a gold cushion with a knife (with a thin, broad blade) to the required width and it is taken up, sometimes with clean paper, or with a frame of wood or pasteboard about six by ten, to which is fastened on the six-inch side, two horse hairs, which are fastened really to a pair of movable shifters of paper by which the required width of the gold can be set. These horse hairs are greased very slightly to make the gold adhere to them. After the edge has received a layer of size with a broad camel-hair brush, the gold is laid down upon it.
After having dried, which fan be determined if thegold cannot be rubbed off from the gilder’s boards which hold the book edge. First, the edge is gone over with a burnisher, lightly, but afterwards with more pressure. The burnisher is an agate. Afterward, a bloodstone is used to give the edge a very high polish. Some papers will require stronger sizes, and some books are gilded when the front edge is round and require tools to fit them.
Head-banding is the next work to be done. Head-bands are plain or ornamental bands over the head and tail of the back. Head-bands generally used are woven and sold by the dealers in bookbinders’ materials, but on very fine books they are made right on the book with heavy silk thread (saddler’s silk).
To make these head-bands, cut a strip of parchment a little narrower than the top and tail squares of the book and a little longer than the width of the back; put the book in a small hand-press after the boards have been pulled down even with the edge, the fore-edge toward the worker, in a position to be handy to work. Thread your needle with one color of silk and tie another thread of another color at the end of the first thread.
Now push your needle in the center of the first section of the left side of the book before you, right under the kettlestitch through the back, pull the one thread of silk through until it stops on account of the knot of the other thread, put the needle through the same place again, and pulling the thread through, you will form a loop through which you put the strip of parchment after you have curved it into the form of the back, and draw it tight so as to hold it in its place. To hold it in its place, put a pin right before it.
Now the first color is brought over from the back of the book with your right hand and passed over to your left hand and held tight. The second color is now picked up with the right hand, brought over to the first, under the parchment, and so repeated until you have to fasten the half-made head-band again by use of the needle as before. The ends are fastened on the back with glue and the surplus of parchment cut off on both sides. It takes a little patience to learn to do this work nicely and in different colors. Now the back of the book is lined, and it depends on the style in which it is to be bound, how it is lined. Flexible sewn books are generally bound with ‘tight backs; that is, the cover is put directly on the back, mostly without any other lining, but sometimes lined with thin leather before being covered. Regular sewn books are lined for a loose or hollow back with tough paper, leather or crash, as may be required. On the loose back the false bands are fastened.
The leather which is to be used has to be pared all around to be turned in, and especial attention should be given so as not to have the corners so thin that it will greatly impair the strength of them. If the cover leather is thick, the paring has to be deeper and fall off gradually. In the joints the leather has to be shaved down so that the board can open and close freely after the book is covered. The boards of the book have to be pared a little at the head and tail to allow the turned in leather more freedom. Books wear out first on the corners and joints, and for that reason all pre-caution should be taken to make those parts as strong as possible, but if the leather is left thick the book will look clumsy.
It is for the skill of the forwarder to overcome this difficulty as much as possible, so that the covered book will appear square and solid to the eye and touch. After the book and the leather have been prepared, the leather is pasted with fresh paste and drawn on the book, but the leather must not be stretched. After the leather has set the heads are set, the bands rubbed in with a folder or bandstick, and the book opened and the boards drawn back so that they stand even with the joint. To prevent the damaging of the end papers it is necessary to put dryers inside the covers, on both sides, front and back.
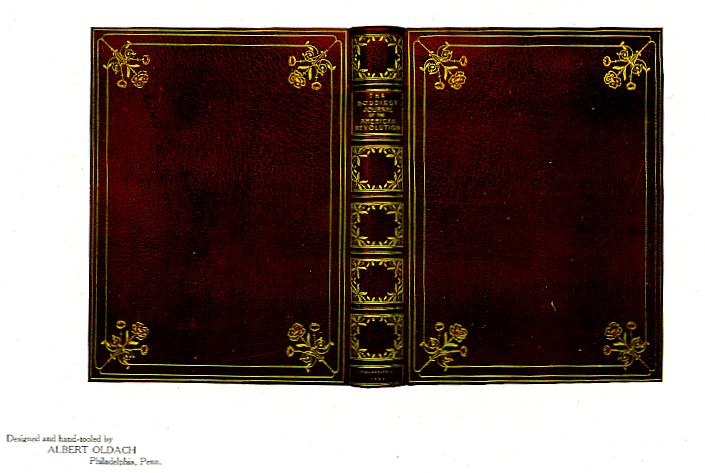
The materials used in better bindings are morocco, levant, calfskin, sealskin, and sometimes pigskin; and for extra work, the best of imported levant and morocco should be used. There are a number of other leathers used, as sheet and split of sheep (skivers), cowhide and split cowhide (buffing), ooze, alligator, snake and other skins. The leathers tanned by our present tanners are not one-tenth as durable as the leather tanned years ago. It is a great waste of materials to have such leather made that will last not more than about ten to fifteen years, when leather tanned the old way would last over a century.
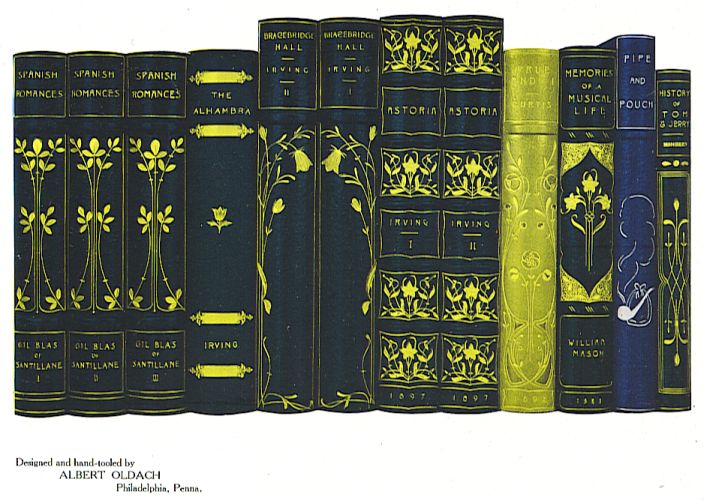
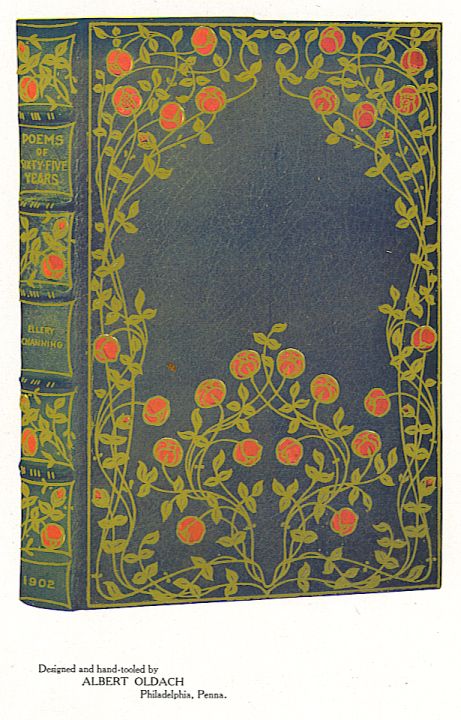
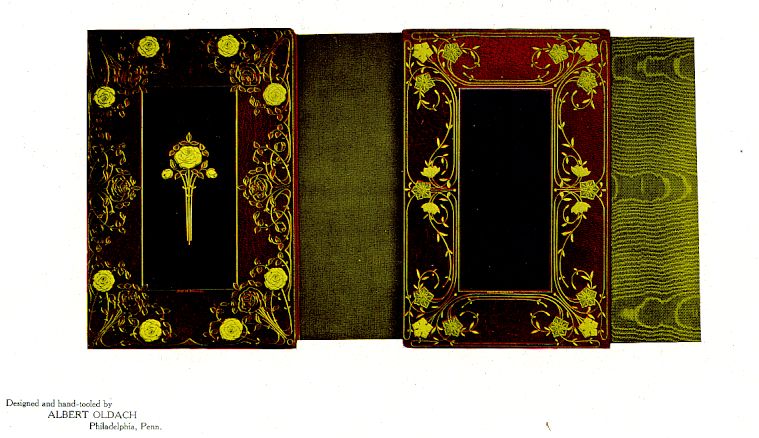
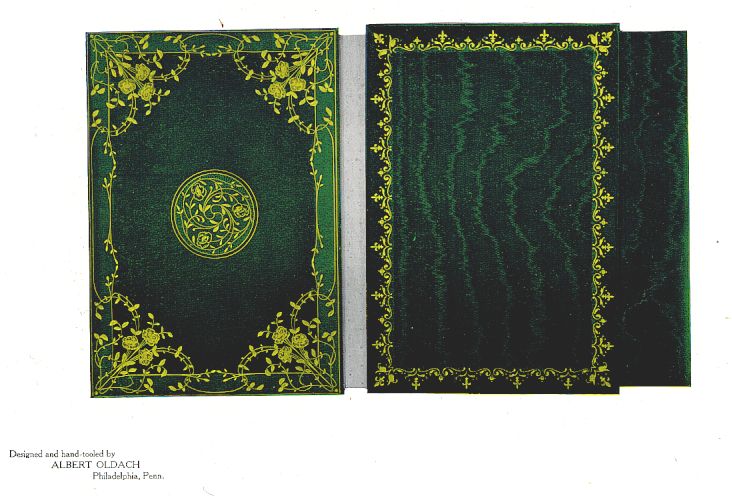
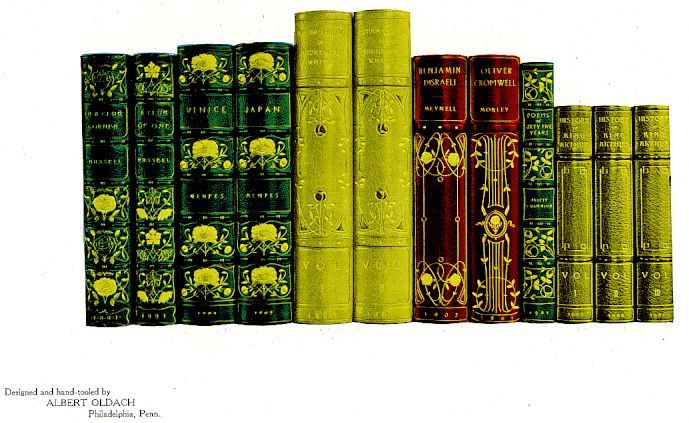
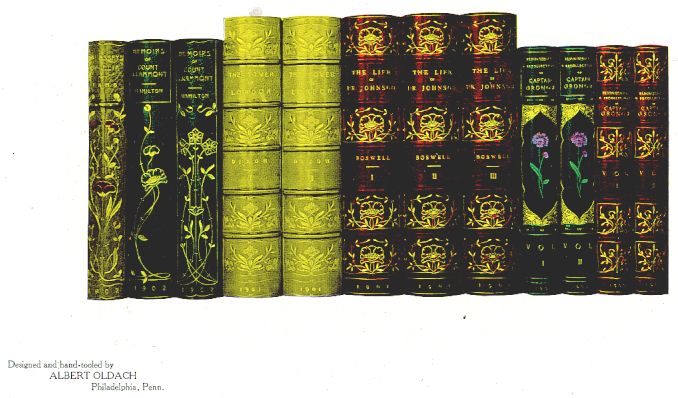
The finishing is the last work to be done to the book. Its main object is to make the book as presentable as possible, and it depends on the original intention whether the book is plain or elaborately ornamented, or in a style which requires extraordinary skill to do it. The ornamentation of a book must be appropriate to the contents of the book or its purpose. It may become necessary or desirable to have special designs for the ornamentation made. To make designs to be executed on books is a task of greater magnitude than may be expected.
To do such work it will require more experience than making designs for many other purposes. The design for book ornamentation must be made so that it can be carried out with such tools as bookbinders can use. These tools are hand-stamps with engraved conventional figures, curved lines, flowers, etc., on their face. After a design is made it is transferred to the side or back of the book by impressing the heated, necessary stamps through the design on the book, after which, the leather on the book is prepared, washed off with diluted vinegar and the impressions of the design penciled in with glaire (white of egg).
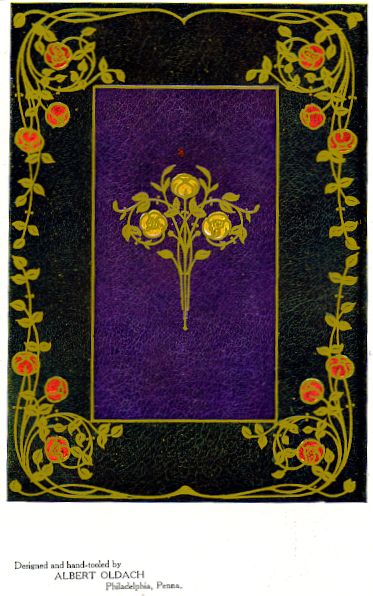
After dry, gold is laid over it, adhered by a very little sweet oil rubbed on the leather before laying the gold, and then tool over again with the same tools, heated to a certain heat, which the worker will find, when commencing to use his tools, not very hot. To make the gold stand bright, cool tools have to be used, not heated more than is absolutely necessary to make the gold stick, and the remaining gold is wiped off clean with a soft rag and soft rubber. It may sometimes be desirable that some of the figures or ornamentation should have other colors than the leather in which the book is bound. This is done by inlays of other colored leather. For small figures or flowers the leather to be used is pared as thin as very thin paper, and cut in the shape of the figure to be inlaid and pasted over it. Larger designs are cut out of the full thickness of’the leather and are put in the space made for them on the book by cutting the same figure out of the leather of the book. The inlays are, of course, made before the gold tooling and have to be exact, and their margins covered with gold.
On very fine books the inside of the book cover is covered with morocco or other fine leather, and very richly tooled (doublure). Some fine books have no other ornamentation than the lettering in gold and the polishing and crushing of the leather, but may be very elaborately tooled and inlaid on the inside covers. The beauty of these books consists in the exact and faultless forwarding. There are different styles of ornamentation for books. Some designs are made entirely of straight or curved lines; others of flowers, arabesque or geometrical figures. It depends on the skill and good taste of the designer to combine the figures or curves and lines to harmonious composition, and the finisher to execute the work of tooling with such exactness and evenness as if of one cast. It must be left to the designer to follow his own imagination and not to be bound by adopted styles, but to take all liberties as long as the purpose is cared for and the fine material vised for the binding shown to best advantage.
Finishers should learn to draw and do their own designing, because they know best what can be executed satisfactorily with the tools in hand, and, therefore, young men who wish to learn finishing should at the same time take drawing lessons. I will say a few words about marbled and colored edges. These edges are really beautiful if executed well. Marbling is done by prepared colors thrown on a size which will allow the colors to expand and float upon it, and which is of a glutinous substance. The colors are body colors and will not mix with water but will adhere to other substances which are dry, and so the colors can be lifted off from the size by paper or other bodies. The size used can be produced from different vegetable substances, as gum Hogg, tragacanth, flea bane and Carageen moss, and others. The gums are prepared by soaking in water, but as they will dissolve slowly it will take sometimes weeks before the size can be used, bvit the gum size will last a long time in usable condition. Carageen moss or Irish moss must be boiled — about five “ounces of moss to three gallons of water, and can be used, after it is cooled off, in about ten hours after boiling.
The size has to be strained. The substance must be tested before using it. If too strong or thick, clean water is added; if too weak, more of the reserve size is added and well mixed. The trough in which the marbling is done is about thirty by forty inches and three inches deep, and lined with zinc. On one end is a partition of three inches with an outlet on one side. The partition is for the purpose of having the waste size and color thrown into it. For small binderies, a trough of less than half the size will do. The trough is filled with the size about two-thirds and if the colors are ready, the marbling can begin. The colors are body colors—earth and lake colors, and must be ground very finely on a marble slab, and handled with a pallet knife of any material but steel, as steel will affect some of the colors. The colors are ground with a little water and sometimes a few drops of oxgall. After the colors are ground they are put up in glass or stone jugs or bottles and corked, ready for use. Oxgall is prepared by putting about a gill of best alcohol to a large gall and after standing in a bottle three to four weeks, it is filtered and kept in a corked bottle for use. The oxgall is used to make the colors expa.nd on the size, and therefore the colors are so prepared by dropping a few drops of gall into each color, always a few more drops into those colors which follow the preceding. The first color shown on the size must expand two to three inches in diameter, and the following colors will by their expansion press the first colors together, and so form the veins in the marble.
Buy a brush with a long handle on which the bristles stand outward. The colors are thrown on the size by twirling the handle between thumb and finger. Of course there is a brush for each color, and each color should be in an earthen or stone vessel about six inches deep and five inches wide. Before any color is thrown on the size, the size is skimmed off with a narrow board like a straightedge, reaching over the full width of the marbling trough, and the skim thrown over into the partition. The size should be kept in the same room where the marbling is done, so that it has the same temperature as the room, which is necessary. The books whichvare to be marbled must be examined as to whether there are any plates in them printed on unsized paper, or whether the book itself is not sized. In such case the edges have to be sized before marbling to prevent the suction of size and color into the book. The books”kre put between stout paste-boards cut the size of the books and dipped carefully into the floating marble; front edge first and entering one end first so as not to let the edge come flat on the surface, and thus to avoid air blisters. The different kinds of marble are produced by combs of different widths and other tools by drawing the colors over the size into any curls desired.
The colors for plain colored edges are also first ground fine and some starch paste added, and one or two drops of glue, and thinned with water so that they will be just thick enough to cover an edge with one application. The color is put on the book by a brush. After the edges are perfectly covered and dry the edges are burnished, and for that purpose are put in the press, rubbed over with a wax rag and burnished with an agate. Red, yellow and green edges are used very frequently. For red, cinnabar is mostly used. For yellow, chrome yellow, and for green, ultramarine and Schweinfurt green mixed with chrome. All the colors used in-marbling and in coloring edges can be bought already ground and prepared, and will save much la.bor to the bookbinder. If a person wishes to become a good workman, and excel in anything, the first requisite is to learn to love his work, and then instead of being a hardship work will become a pleasure.
IT is no mere fancy, then, of the booklover or of the decorator, that lettering is worthy of its place in ornament. Lines of well-formed lettering, whether on the page of a book or on the panel of a wall, break its surface pleasantly. It has only to be proportioned and set out with judgment to decorate the one or the other—modestly it is true, but the best of decoration is modest; and it is not the least of the ornamental qualties belonging to lettering that it does not clamour for attention, but will occupy a given space without asserting itself.
Lewis F. Day.