
CHAPTER IV
Paper Cutter Knives
BEST RESULTS IN PAPER CUTTING demand that the cutter be equipped with a knife of the highest quality, properly sharpened. Knives should be bought from reputable makers or from the cutting machine manufacturer to insure getting the best quality, uniformly tempered metal. Soft spots found in the bevels of cheap knives break easily, either ruining the knife or shortening its life by requiring excessive grinding.
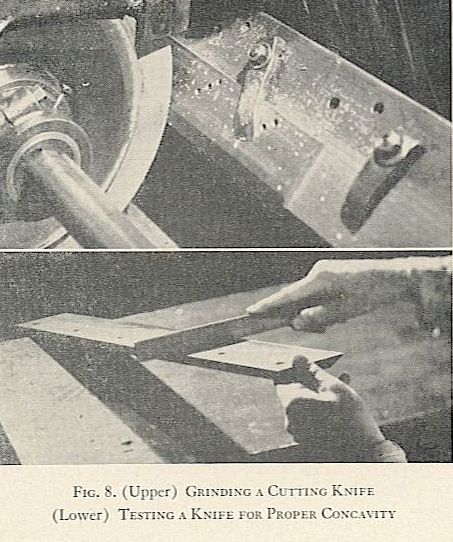
FIG. 8. (upper) GRINDING A CUTTING KNIFE
(Lower) TESTING A KNIFE FOR PROPER CONCAVITY
Knives for new machines may be ordered by furnishing catalog numbers or dimensions given by the machine maker. Where this information is unavailable, as on an obsolete or specially-built machine, the knife supplier must be given a cardboard tracing of the old knife, or the knife itself as a sample.
When furnishing patterns, care must be taken to locate the holes in their exact positions, to show the size of the holes and the number of threads per inch.
Most knives have two or three rows of holes so the knife may be lowered on the bar as it is ground down in sharpening.
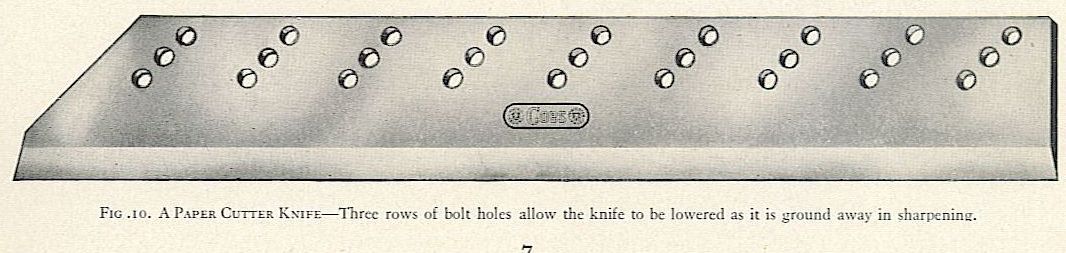
When using the center or upper row of holes most machines require the insertion of a steel bar along the top of the knife to keep the knife parallel with the knife holding bar to which the knife is bolted, and to keep the cutting pressure off the bolts.
Good quality knives are ground very slightly concave from the cutting edge to the top on the side opposite the bevel. This gives clearance and prevents the
knife from binding against the paper being held by the clamp. A knife that is too concave or too convex will tend to dig in or out of die stock pile instead of making the normal vertical descent. To check a knife which is concave ground, hold the knife flat, bevel side down, with one end toward a strong light source. (Figure 8, lower.) Move a true straightedge along the face while looking toward the light. Dark spots, showing points of contact, should appear only at the cutting edge and the back edge.
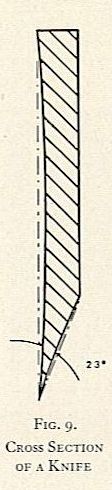
Standard bevel is of a length which allows the knife to throw the cut paper toward the operator enough to prevent binding. Its length is in proportion to the thickness of the knife. Standard bevel is 23 degrees or a depth times the thickness of the knife. Where a knife is to he used exclusively for one kind of paper the angle of the bevel may be changed. A blunt bevel helps in cutting hard papers, and a long thin bevel aids in cutting soft papers. When possible a specially tempered knife is best when cutting only cardboards, varnished paper or hard stock.
Care of cutting knives. As previously stated, best results in paper cutting are obtained with a good quality knife, properly sharpened. In larger cities a reliable grinding specialist may be found to sharpen knives according to the manufacturers specifications. Where this service is not available, knives should be shipped to a printers’ supply house which maintains facilities for proper grinding and honing.
Material in this section is based upon Paper Crating, a booklet issued by the Henry Disston and Sons Company, Philadelphia, 1938.
The frequency with which knives must be sharpened depends upon the quality and temper of the steel and the type of paper being cut. A dull knife always increases the draw , makes a wider impression on the cutting stick and causes the cut edges of the paper to stick together.
Too rapid dulling of the knife, or a knife which breaks easily may indicate that it was sharpened with a grinding wheel which was too small, resulting in a highly concave bevel. Or these conditions may mean the knife became too hot in grinding with a resulting damage to the temper of the metal.
A knife not in use should be coated with oil to prevent rusting. This must be carefully removed before using to prevent soiling the paper. A wire edge sometimes found on the edge of a newly-sharpened knife may be removed by dragging a piece of hardwood along the edge.
An oily rag, soap or paraffin rubbed along the bevel will make a dull knife cut more easily and give a cleaner face to the cut. Applications should be light and are not necessary when the knife is sharp.
Do not allow the knife to drive over 1/64 inch into the cutting stick. Be particularly careful that the cutter bed is kept clear of rulers, wrenches, or any foreign object which might get under the knife. In cutting wire stitched work avoid cutting into the metal. Severe damage to the knife is the result of cutting objects other than paper.
Knives are easily harmed by different kinds of paper unless proper precautions are taken in cutting. Following is a list of some of these stocks, how they affect knives, and the best cutting procedures:
Glassine should not be cut with a sharp knife, being likely to cause nicks in the blade. If large quantities of glassine are to be cut a knife should be ground with a short bevel for the task.
Antique papers require a very sharp knife and will dull the knife quickly. Lifts should be limited toj./., of the capacity of the machine. Soap or paraffin rubbed lightly across the bevel helps somewhat.
Magazines with pages of different papers will dull a knife quickly.
Gummed papas draw more than others and often nick the sharp knife they require.
Pressboard should be cut only with a knife that has worn down and is becoming dull. It is hard to cut and contains foreign matter that often nicks the knife.
Newsboard and reclaimed boards often contain particles of foreign matter that cause small nicks. Wait until a knife is dull before cutting.
Blotting paper, because of its softness, is hard on knives. Lifts should be limited to TOO or 125 sheets with protecting cardboard at the ;op to prevent clamp marks.
Dull finish coated papers should be cut in small lifts because of their tendency to break pieces from the knife.
When cutting varnished papers, rub an oily rag across the bevel of the knife. This will help prevent the dry varnish from nicking the knife.
The following table summarizes the effect of common kinds of paper upon a cutting knife:
PAPER PECULIARITIES
Newsprint Easy to cut. Machine may be loaded to near capacity.
Machine finish book Slightly harder to cut. Super book (Ss:SC) Medium hard to cut.
Coated book Hard to cut. Dulls knife.
Cover Heavy and tough. Hard to cut.
Bonds and ledgers Very easy to cut.
Antique book Tough, bulky. Hard to cut and very hard on knife.
Label papers Easy to cut.
Gummed papers Hard to cut. Often nick knife.
Pressboard Hardest paper to cut. Nicks knife.
Bristol boards Tough. Dull knife in short time. Straw and chip board Medium hard to cut. Nick knife.
To insert and adjust the cutting knife. Lower the dull knife until it touches the cutting stick. Remove the knife bolts with a socket wrench and raise the knife holding bar to its top position. Turn off the motor. Thread in two knife handles or bolts and remove the dull knife by lifting slightly to one side to clear the machine frame and pulling toward the front of the cutter. Place the dull knife flat in a safe position for measurement. Remove handles.
Remove the sharp knife from its shipping cover and compare its width with the width of the dull knife. If the knife to be installed is wider than the dull knife, raise the knife holding bar the amount of the difference in width plus 1/8 inch. Raising and lowering the knife bar is generally done with turnbuckles or eccentrics in the drawbars.
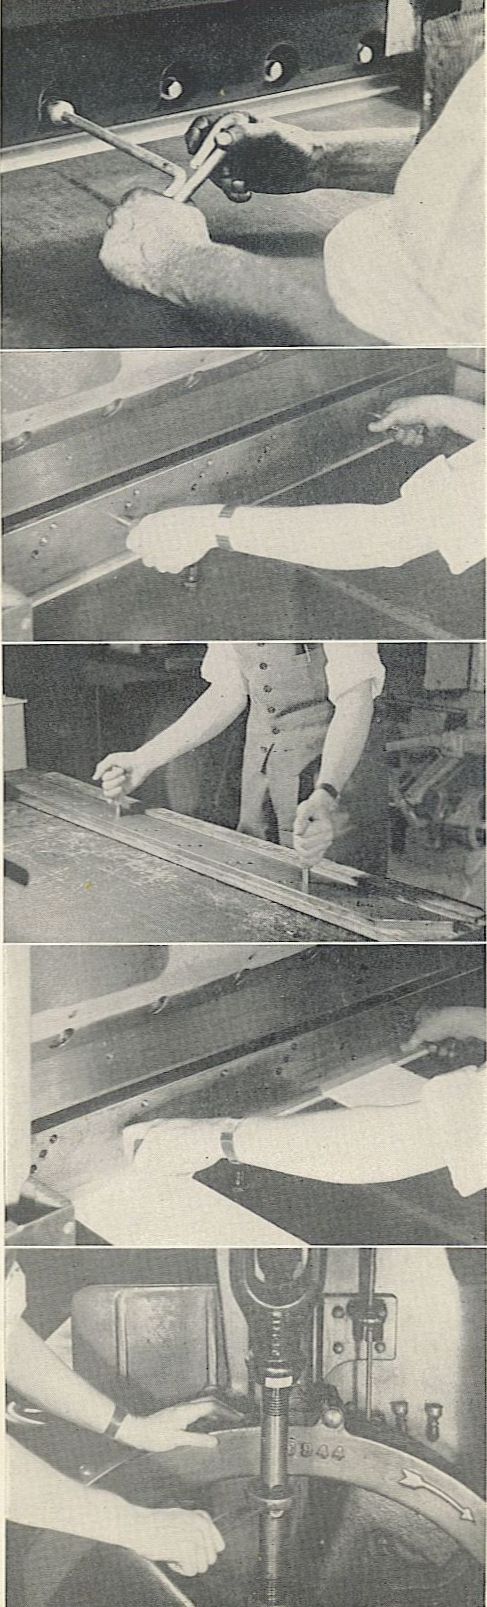
FIG. II. STEPS IN CHANGING A CUTTING KNIFE
Top to bottom: (a) Lower the dull knife and remove bolts with a socket wrench. (b) Raise knife bar, insert handles and remove dull knife.(c) Remove sharp knife from case. (d) Place sharp knife in position with edge protected by scrap paper. (e) Adjust knife to cutting stick by moving turnbuckle on each drawbar.
Place thin wooden strips or a 72 inch lift of waste paper over the cutter stick for the sharp knife to rest upon during installation. Insert handles into the sharp knife and lift it carefully into position. Remove the handles, lift the starting levers and lower the knife bar slowly. Align the bolt holes, insert all bolts, turn the bolts until snug, then tighten with a socket wrench. (On some machines it is necessary to raise the knife in order to remove, insert or tighten the end bolts.)
Make certain that the bottom of the knife stroke leaves the knife clear of the cutter stick. Raise the knife to its top position. Insert a new cutter stick, or turn the old stick to a fresh position. Remove all tools from the cutter bed and clean spots of dirt or oil. Test the blade setting by placing a sheet of 16 lb. bond across the full width of the cutter. Gradually adjust the blade downward until it cuts evenly through one sheet but does not dig more than 1/64 inch into the wood.
Insert handles into the dull knife. Using a heavily oiled cloth, coat both sides of the dull knife with oil to protect its surface from rust in storage. Place the knife in its shipping cover, fasten bolts, and remove handles.
Caution! Every precaution should be observed in the handling of uncovered knives. Severe bodily injury can result from careless handling. When removing and inserting knives, care should also be taken that the sharpened edge is not struck against any part of the machine to prevent chipping the edge. Be safe—use handles with unprotected knives!